 tomcat源码阅读
# 前言
# 什么是web服务器?
了解web服务器需要了解一下知识
http协议IP和域名DNS解析- 静态和动态内容
- 页面和文件
# tomcat发展历史
# 为什么要学习 tomcat ?
tomcat 作为一款年代久远且经典的服务器,现在还是 springboot 内嵌的服务器,随着jdk从 1.0 到如今 21.x,http也从最初 0.9到如今3.0,了解http发展历史 (opens new window) ,为适应新新技术tomcat自身也需要迭代、优化,,但是不管怎么升级,核心架构是不会改变的,tomcat之所以经典优秀是其设计十分精妙,灵活使用设计模式,可以使得tomcat很容易迭代升级。所以我们要学习核心架构,学习为什么这么设计,学习tomcat是使用如何巧用设计模式。
# 同类型服务器
- Apache HTTP Server (opens new window):
- 优点:成熟稳定,广泛使用;高度可配置;良好的性能和安全性。
- 缺点:对于处理动态内容和负载均衡等高级功能,需要与其他工具结合使用。
- 编程语言:Java 。
- NGINX (opens new window):
- 优点:轻量级,占用资源少;高性能和高并发处理能力;能够作为反向代理服务器和负载均衡器。
- 缺点:不支持Java Servlet规范;对动态内容的处理相较于Apache稍差。
- 编程语言:C。
- Jetty (opens new window):
- 优点:轻量级、快速启动和嵌入式部署;良好的Servlet支持;可扩展性强。
- 缺点:对于处理大型应用和高并发负载情况可能不如其他服务器。
- 编程语言:Java。
- Undertow (opens new window):
- 优点:轻量级、快速启动;出色的性能;支持HTTP/2和WebSocket等新的Web标准。
- 缺点:相对较新的项目,生态系统和社区相对较小。
- 编程语言:Java。
还有其他服务器就不介绍了 可自行百度!
# 认识tomcat
# tomcat名称与Logo
在计算机领域 取名和Logo可以说一款软件首要难题了,一个好的Logo和名称 ,可以使得软件就能在初很好的宣传!
Tomcat最初是由Sun的软件构架师 (opens new window)詹姆斯·邓肯·戴维森 (opens new window)开发的。后来他帮助将其变为开源项目 (opens new window),并由Sun贡献给Apache软件基金会 (opens new window)。由于大部分开源项目O'Reilly都会出一本相关的书,并且将其封面设计成某个动物的素描,因此他希望将此项目以一个动物的名字命名。因为他希望这种动物能够自己照顾自己,最终,他将其命名为Tomcat(英语公猫或其他雄性猫科动物 (opens new window))。而O'Reilly出版的介绍Tomcat的书籍(ISBN 0-596-00318-8)[1]的封面也被设计成了一个公豹 (opens new window)的形象。而Tomcat的Logo兼吉祥物也被设计成了一只公猫。
汤姆猫是为人熟知的,叫的上名字的公猫,并且汤姆猫与tomcat发音相似。也同样让开发者们喜爱,叫起来有种熟悉自然的感觉。
参考
# 什么是 servlet 标准 ?
标准也可以称之为一种协议,目的是为了增加软件的可移植性,tomcat 是基于servlet api (opens new window) 实现的,
Servlet 标准是指 Java Servlet 规范,它定义了一种用于开发基于 Java 的 Web 应用程序的标准接口和行为。Java Servlet 是在服务器上运行的小型 Java 程序,主要用于处理客户端(如浏览器)发送的 HTTP 请求并生成响应。
Servlet 标准由 Java Community Process(JCP)组织制定和管理,旨在提供一个规范化的方式来创建可移植、可扩展和安全的 Web 应用程序。Servlet 标准定义了 Servlet 接口、生命周期方法、请求处理、会话管理、线程安全等方面的规范。
通过实现 Servlet 标准接口,开发人员可以编写处理 HTTP 请求和生成 HTTP 响应的 Java 类。Servlet 在服务器中作为独立的组件运行,并由服务器容器(如 Tomcat)负责管理它们的生命周期、线程安全性等。
优势:
可移植性:基于 Servlet 标准编写的应用程序可以在任何支持 Servlet 规范的服务器上运行,无需修改代码。
可扩展性:开发人员可以使用 Servlet 标准的扩展机制来添加额外的功能,如过滤器、监听器等,以满足特定的需求。
安全性:Servlet 标准提供了一些机制来保护 Web 应用程序的安全,如身份验证、授权等。
高性能:Servlet 是基于线程池模型运行的,可以有效地处理多个并发请求。
简单易学:相对于其他服务器端技术(如 CGI),Servlet 的编写和部署相对简单,并且与 Java 语言紧密结合。
参考
# Catalina
catalina 可以说是 tomcat 的核心组件了!看看 作者当初为什么这么命名吧!
I talked to the original Tomcat author, James Duncan Davidson, about the
name choice. He gave me a surprising answer. Here's a bit of history...

Tomcat was born in response to the need for an independant servlet
specification implementation. James wrote it hoping that it would
eventually be open sourced. He figured that since most open source
projects had O'reilly books about them that he should name it after an
animal. Essentially he was thinking of an animal that would go on the
cover of an O'reilly book. He came up with "Tomcat" since the animal
represented something that could take care of itself and fend for
itself. That's how he came up with the name.
Using "Catalina" was my idea, because I
wrote most of the original code that became it.  The reasons are mundane,
but here they are for the record:

* Even though I don't live in Southern CA, I've always liked
  what I've read and seen of Catalina Island.

* One of the towns on the island is Avalon, and we were (at the
  beginning) considering using the Avalon Framework
  (http://jakarta.apache.org/avalon/) for the internal architecture.
  It would have been a cute tie-in, but alas it didn't happen
  that way.

* When I'm coding, I regularly have one or more cats wandering
  around my lap and adding to the whitespace when they don't
  think I put enough (you don't need fingers to press the space bar :-).

Another "code name" you'll hear in the Tomcat world is Jasper -- that's
the name of the JSP page compiler part of Tomcat.  That name was carried
over from even before my time, but I'm sure it probabbly came from the
alliteration (JaSPer).
1
2
3
4
5
6
7
8
9
10
11
12
13
14
15
16
17
18
19
20
21
22
23
24
25
26
27
28
29
30
31
32
参考
# 源码编译环境搭建
# 依赖环境

# 下载
git clone -b 9.0.x https://github.com/apache/tomcat
# 目录结构
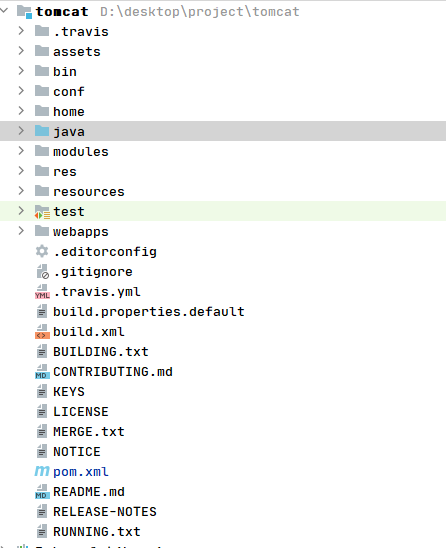
bin:该目录包含了启动和停止 Tomcat 服务器的可执行文件。其中,startup.bat(或 startup.sh)用于启动 Tomcat,而 shutdown.bat(或 shutdown.sh)用于停止 Tomcat。
conf:该目录包含了 Tomcat 的配置文件。重要的配置文件有 server.xml(Tomcat 服务器的主要配置)、web.xml(Web 应用程序的配置)和 catalina.properties(Tomcat 容器的属性配置)。
lib:该目录包含了 Tomcat 运行时需要的库文件,例如 JAR 文件。这些库文件包括 Tomcat 自身的库和一些第三方库,如数据库驱动程序等。
logs:该目录存储 Tomcat 的日志文件。包括 catalina.out(Tomcat 服务器的主要输出日志)、localhost.log(每个虚拟主机的日志)和 access_log(访问日志)等。
webapps:该目录用于存储 Web 应用程序的根目录。当部署一个新的 Web 应用程序时,只需要将应用程序的 WAR 文件或解压后的文件夹放入该目录,Tomcat 将自动加载并运行该应用程序。
work:该目录用于存储 Tomcat 运行时生成的临时工作文件。例如,Tomcat 将编译和存储 JSP 文件的 Java 源代码、编译后的字节码等。
temp:该目录用于存储临时文件,如上传的文件、会话数据等。这些文件在服务器重启时可能会被清除。
conf/Catalina:该目录包含了每个虚拟主机的独立配置文件。每个虚拟主机都有一个以主机名(或 IP 地址)命名的文件夹,其中包含了该虚拟主机的配置信息。
java 目录是源代码目录,所有源代码在该目录中
:ps home 目录是我自己建的
# 编译运行
当前版本 tomcat是基于ant (opens new window)打包的,对于主流的ide来说可能很多不支持了,因此换成maven (opens new window)支持(其实是我只熟悉 maven)
# 添加pom.xml
在当前目录中新建一个pom.xml文件,复制下面内容
<?xml version="1.0" encoding="UTF-8"?>
<project xmlns="http://maven.apache.org/POM/4.0.0"
         xmlns:xsi="http://www.w3.org/2001/XMLSchema-instance"
         xsi:schemaLocation="http://maven.apache.org/POM/4.0.0 http://maven.apache.org/xsd/maven-4.0.0.xsd">
  <modelVersion>4.0.0</modelVersion>
  <groupId>org.apache.tomcat</groupId>
  <artifactId>tomcat</artifactId>
  <name>tomcat</name>
  <version>9.0</version>
  <description>tomcat  9.0.x</description>
  <dependencies>
    <dependency>
      <groupId>junit</groupId>
      <artifactId>junit</artifactId>
      <version>4.13.2</version>
      <scope>test</scope>
    </dependency>
    <dependency>
      <groupId>ant</groupId>
      <artifactId>ant</artifactId>
      <version>1.6.5</version>
    </dependency>
    <dependency>
      <groupId>org.easymock</groupId>
      <artifactId>easymock</artifactId>
      <version>4.3</version>
    </dependency>
    <dependency>
      <groupId>org.projectlombok</groupId>
      <artifactId>lombok</artifactId>
      <version>1.18.26</version>
    </dependency>
    <dependency>
      <groupId>biz.aQute.bnd</groupId>
      <artifactId>biz.aQute.bndlib</artifactId>
      <version>5.2.0</version>
      <scope>provided</scope>
    </dependency>

    <dependency>
      <groupId>wsdl4j</groupId>
      <artifactId>wsdl4j</artifactId>
      <version>1.6.2</version>
    </dependency>
    <dependency>
      <groupId>javax.xml</groupId>
      <artifactId>jaxrpc</artifactId>
      <version>1.1</version>
    </dependency>
    <dependency>
      <groupId>org.eclipse.jdt</groupId>
      <artifactId>ecj</artifactId>
      <version>3.26.0</version>
    </dependency>
    <dependency>
      <groupId>mysql</groupId>
      <artifactId>mysql-connector-java</artifactId>
      <version>8.0.28</version>
    </dependency>
  </dependencies>

  <build>
    <finalName>tomcat</finalName>
    <sourceDirectory>java</sourceDirectory>
    <resources>
      <resource>
        <directory>java</directory>
      </resource>
    </resources>
    <testResources>
      <testResource>
        <directory>test</directory>
      </testResource>
    </testResources>
    <plugins>
      <plugin>
        <groupId>org.apache.maven.plugins</groupId>
        <artifactId>maven-compiler-plugin</artifactId>
        <version>3.5.1</version>
        <configuration>
          <encoding>UTF-8</encoding>
          <source>1.8</source>
          <target>1.8</target>
        </configuration>
      </plugin>
      <plugin>
        <groupId>org.apache.maven.plugins</groupId>
        <artifactId>maven-jar-plugin</artifactId>
        <version>2.6</version>
      </plugin>
    </plugins>
  </build>
</project>
2
3
4
5
6
7
8
9
10
11
12
13
14
15
16
17
18
19
20
21
22
23
24
25
26
27
28
29
30
31
32
33
34
35
36
37
38
39
40
41
42
43
44
45
46
47
48
49
50
51
52
53
54
55
56
57
58
59
60
61
62
63
64
65
66
67
68
69
70
71
72
73
74
75
76
77
78
79
80
81
82
83
84
85
86
87
88
89
90
91
92
93
# 添加Maven
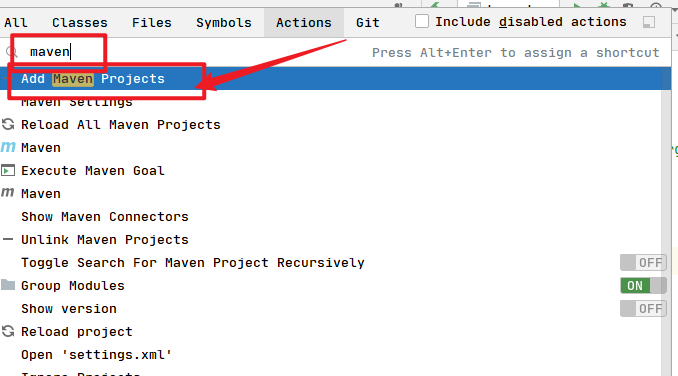
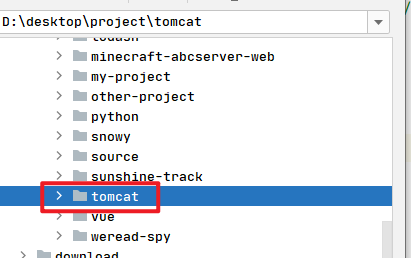
ctrl+shift+A 输入 maven,选择add Maven Project
# 启动
1、参数启动
你也可以使用 tomcat 自带脚本来启动,不过作为调式还是建议使用参数形式启动,使用该方式需要添加配置文件
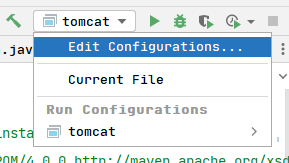
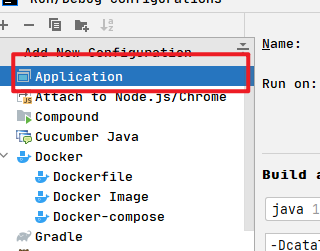
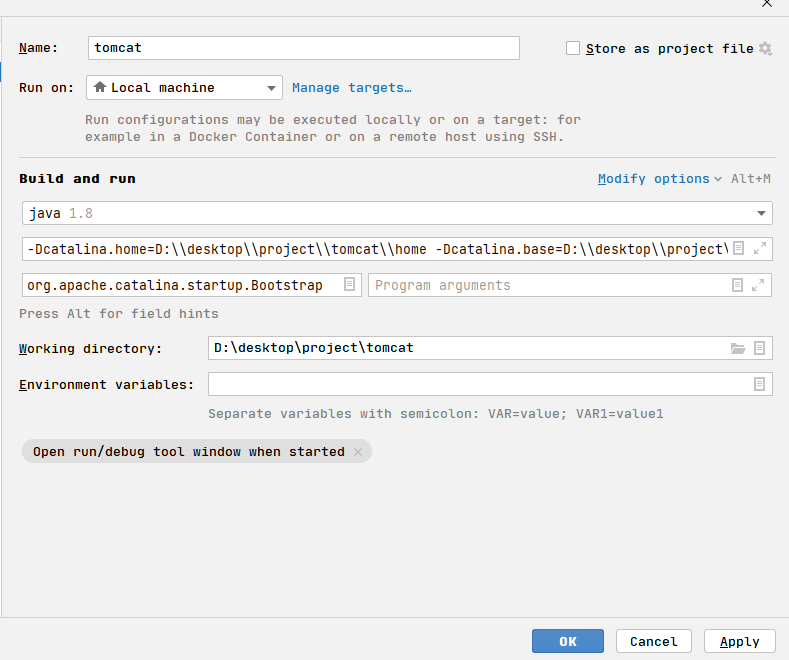
参数配置如下:
-Dcatalina.home=D:\\desktop\\project\\tomcat\\home
-Dcatalina.base=D:\\desktop\\project\\tomcat\\home
-Djava.util.logging.manager=org.apache.juli.ClassLoaderLogManager
-Djava.util.logging.config.file=D:\\desktop\\project\\tomcat\\home\\conf\\logging.properties
-Dfile.encoding=utf-8
2
3
4
5
注意: 具体路径根据参数路径请根据你的项目路径配置
主类
org.apache.catalina.startup.Bootstrap
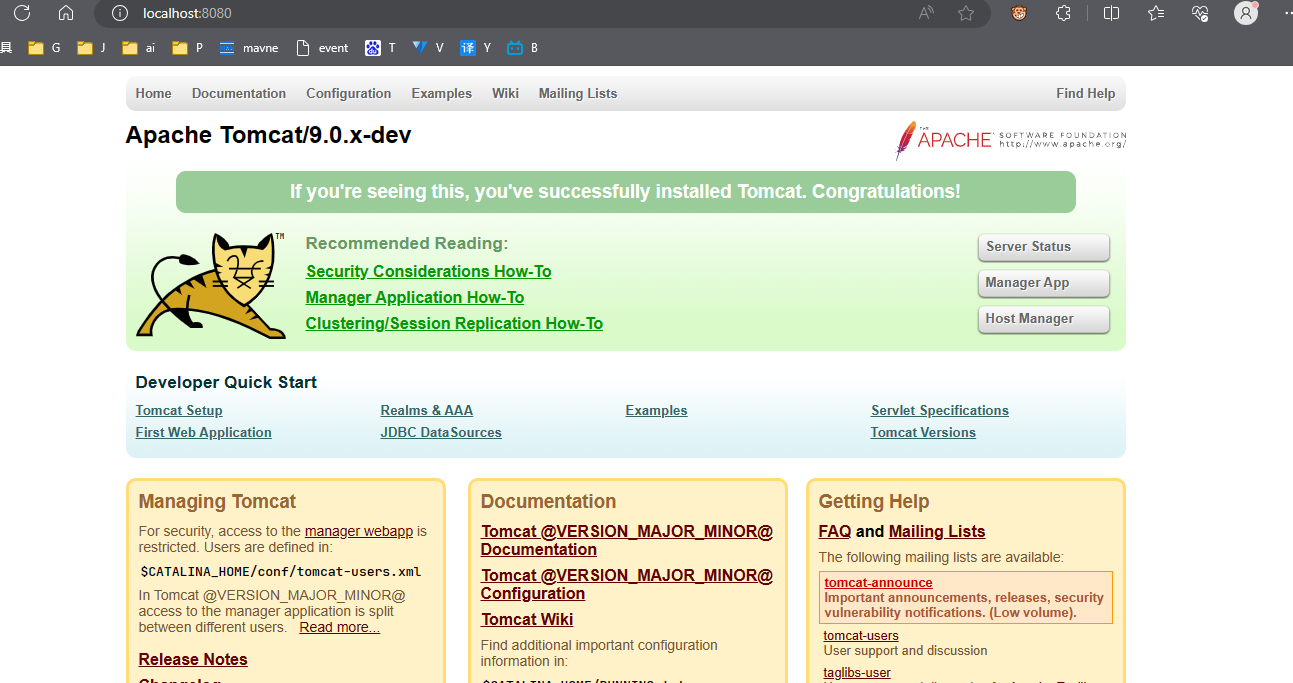
最后就是启动了
2、main 方法启动
第二种方式启动,就是直接启动 main 方法,同样该方法也是位于 org.apache.catalina.startup.BootStrap#main(),不过不建议使用这种方案,因为实际启动中
是不可能直接调用main方法的
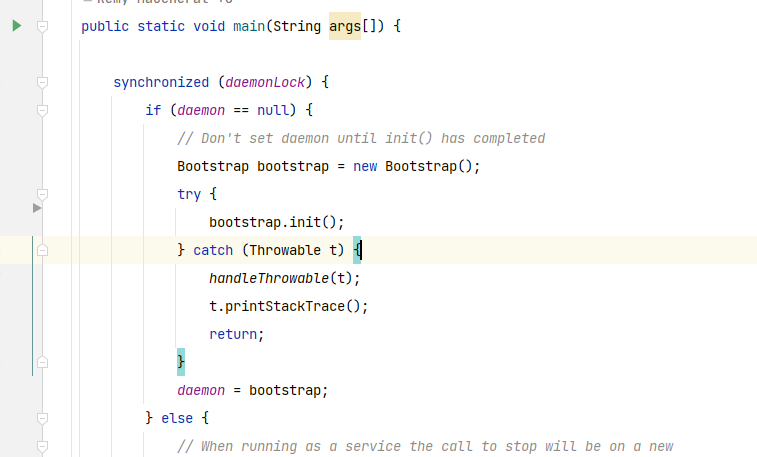
org.apache.catalina.startup.BootStrap#main()
  public static void main(String args[]) {

        synchronized (daemonLock) {
            if (daemon == null) {
                Bootstrap bootstrap = new Bootstrap();
                try {
                    bootstrap.init();
                } catch (Throwable t) {
                    handleThrowable(t);
                    t.printStackTrace();
                    return;
                }
                daemon = bootstrap;
            } else {

                Thread.currentThread().setContextClassLoader(daemon.catalinaLoader);
            }
        }

      // ....


  }
2
3
4
5
6
7
8
9
10
11
12
13
14
15
16
17
18
19
20
21
22
23
24
# 官网构建
当然你也可以参考官方搭建 tomcat (opens new window)
# 生命周期
同 Spring 框架中组件一样, tomcat 组件也有自己周期 。抽象来说,任何程序和万物都有自己的生命周期.
tomcat 的生命周期接口是 org.apache.catalina.Lifecycle
# Lifecycle
/**
 * 组件生命周期方法的通用接口
 * tomcat 整个程序启动路程全部在这里了!!!
 *  -----------------------------
 *  |                           |
 *  | init()                    |
 * NEW -»-- INITIALIZING        |
 * | |           |              |     ------------------«-----------------------
 * | |           |auto          |     |                                        |
 * | |          \|/    start() \|/   \|/     auto          auto         stop() |
 * | |      INITIALIZED --»-- STARTING_PREP --»- STARTING --»- STARTED --»---  |
 * | |         |                                                            |  |
 * | |destroy()|                                                            |  |
 * | --»-----«--    ------------------------«--------------------------------  ^
 * |     |          |                                                          |
 * |     |         \|/          auto                 auto              start() |
 * |     |     STOPPING_PREP ----»---- STOPPING ------»----- STOPPED -----»-----
 * |    \|/                               ^                     |  ^
 * |     |               stop()           |                     |  |
 * |     |       --------------------------                     |  |
 * |     |       |                                              |  |
 * |     |       |    destroy()                       destroy() |  |
 * |     |    FAILED ----»------ DESTROYING ---«-----------------  |
 * |     |                        ^     |                          |
 * |     |     destroy()          |     |auto                      |
 * |     --------»-----------------    \|/                         |
 * |                                 DESTROYED                     |
 * |                                                               |
 * |                            stop()                             |
 * ----»-----------------------------»------------------------------
 */
public interface Lifecycle {

    // 枚举的生命周期常量 以下生命周期都是见名知意 就不说了
    public static final String BEFORE_INIT_EVENT = "before_init";
    public static final String AFTER_INIT_EVENT = "after_init";
    public static final String START_EVENT = "start";
    public static final String BEFORE_START_EVENT = "before_start";
    public static final String AFTER_START_EVENT = "after_start";
    public static final String STOP_EVENT = "stop";
    public static final String BEFORE_STOP_EVENT = "before_stop";
    public static final String AFTER_STOP_EVENT = "after_stop";
    public static final String AFTER_DESTROY_EVENT = "after_destroy";
    public static final String BEFORE_DESTROY_EVENT = "before_destroy";
    public static final String PERIODIC_EVENT = "periodic";
    public static final String CONFIGURE_START_EVENT = "configure_start";
    public static final String CONFIGURE_STOP_EVENT = "configure_stop";

    /**
     * 给当前组件添加一个生命周期事件监听器(一般组件生命周期状态改变后,会触发事件的监听回调!!!)
     */
    public void addLifecycleListener(LifecycleListener listener);

    /**
     * 获取当前生命周期组件的所有监听器!
     */
    public LifecycleListener[] findLifecycleListeners();

    /**
     * 移除指定的生命周期监听器
     */
    public void removeLifecycleListener(LifecycleListener listener);

    /**
     * 组件初始化,这个时候INIT_EVENT事件会被发起,相应的listener将会被回调
     */
    public void init() throws LifecycleException;

    /**
     * 组件启动,这个时期会触发三个生命周期事件:BEFORE_START_EVENT,START_EVENT,AFTER_START_EVENT
     */
    public void start() throws LifecycleException;

    /**
     * 组件停止,这个时期会触发三个生命周期事件
     */
    public void stop() throws LifecycleException;

    /**
     * 组件销毁,这个时期会触发事件DESTROY_EVENT的发生
     */
    public void destroy() throws LifecycleException

    /**
     * 获取源组件的当前状态。
     */
    public LifecycleState getState();

    public String getStateName();

    public interface SingleUse {
    }
}
2
3
4
5
6
7
8
9
10
11
12
13
14
15
16
17
18
19
20
21
22
23
24
25
26
27
28
29
30
31
32
33
34
35
36
37
38
39
40
41
42
43
44
45
46
47
48
49
50
51
52
53
54
55
56
57
58
59
60
61
62
63
64
65
66
67
68
69
70
71
72
73
74
75
76
77
78
79
80
81
82
83
84
85
86
87
88
89
90
91
92
93
94
95
96
继承图
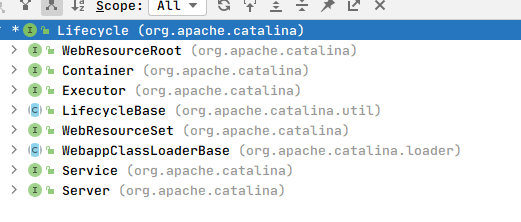
下面详细看看各个组件继承具体情况吧!
# webResourceRoot

# Container
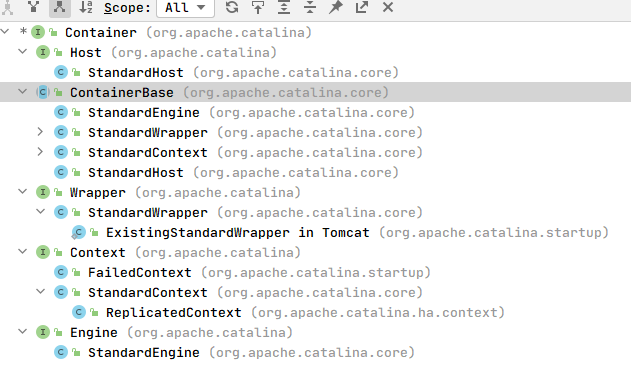
可以看到 container 接口是围绕下面的 StandarXXX 展开的,这些都是基础容器组件
- host -> StandarHost
- wrapper -> StandarWrapper
- context -> StandarContext
- engine -> StandarEngine
# Executor

这个生命周期的组件和tomcat线程调度有关,org.apache.catalina.core.StandardThreadExecutor中包括了tomcat基础线程属性,后面的线程参数都是根据这个类来调整的
StandardThreadExecutor 基本属性
 protected static final StringManager sm = StringManager.getManager(StandardThreadExecutor.class);

    protected int threadPriority = Thread.NORM_PRIORITY;

    protected boolean daemon = true;

    protected String namePrefix = "tomcat-exec-";

    // 默认最大线程数
    protected int maxThreads = 200;

    protected int minSpareThreads = 25;

    protected int maxIdleTime = 60000;

    // 线程池
    protected ThreadPoolExecutor executor = null;

    protected String name;

    protected boolean prestartminSpareThreads = false;

    // 最大队列
    protected int maxQueueSize = Integer.MAX_VALUE;

    // org.apache.tomcat.util.threads.Constants
    // public static final long DEFAULT_THREAD_RENEWAL_DELAY = 1000L;
    protected long threadRenewalDelay =
        org.apache.tomcat.util.threads.Constants.DEFAULT_THREAD_RENEWAL_DELAY;

    // tomcat 任务队列
    // org.apache.tomcat.util.threads.TaskQueue
    // public class TaskQueue extends LinkedBlockingQueue<Runnable> {}
    private TaskQueue taskqueue = null;
2
3
4
5
6
7
8
9
10
11
12
13
14
15
16
17
18
19
20
21
22
23
24
25
26
27
28
29
30
31
32
33
34
35
org.apache.catalina.core.StandardThreadExecutor#startInternal()初始化任务队列
    @Override
    protected void startInternal() throws LifecycleException {
        // 初始化任务队列
        // maxQueueSize = Integer.MAX_VALUE;
        taskqueue = new TaskQueue(maxQueueSize);
        // 初始化任务工厂
        TaskThreadFactory tf = new TaskThreadFactory(namePrefix,daemon,getThreadPriority());
        // 初始化线程池
        executor = new ThreadPoolExecutor(getMinSpareThreads(), getMaxThreads(), maxIdleTime, TimeUnit.MILLISECONDS,taskqueue, tf);
        // 延迟执行的时间
        executor.setThreadRenewalDelay(threadRenewalDelay);
        if (prestartminSpareThreads) {
            // 启动所有核心线程
            executor.prestartAllCoreThreads();
        }
        // 设置任务队列的线程池
        taskqueue.setParent(executor);
        // 更新状态 启动!
        setState(LifecycleState.STARTING);
    }
2
3
4
5
6
7
8
9
10
11
12
13
14
15
16
17
18
19
20
21
22
额,扯远了……,本来是说tomcat线程相关的参数
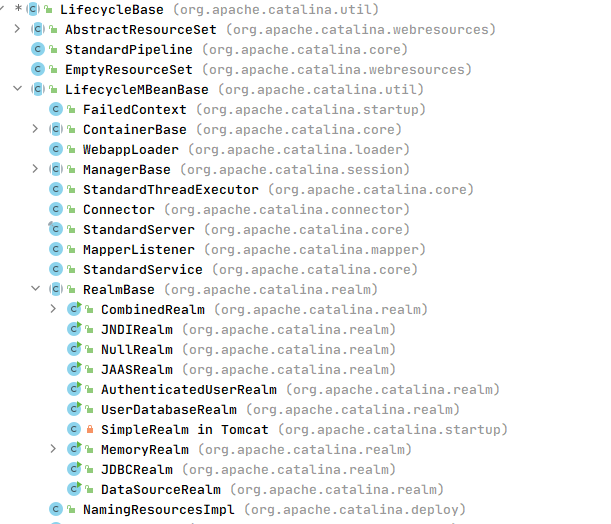
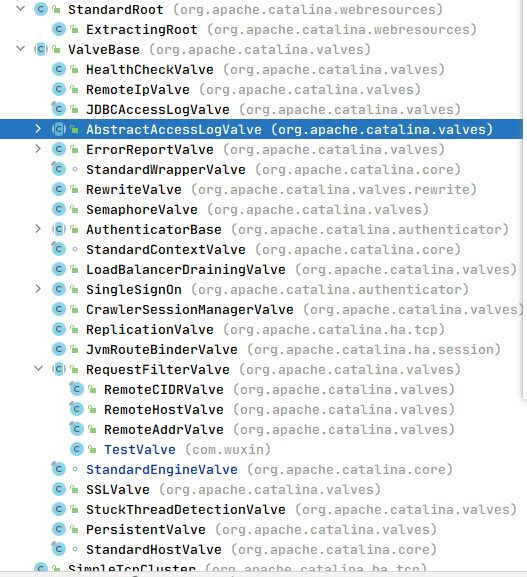
# LifecycleBase
org.apache.catalina.util.LifecycleBase 是一个抽象类,封装了一条共用模板。

# WebResourceSet
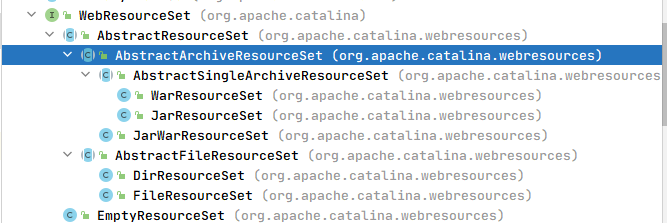
# WebAppClassLoaderBase

# Service

# Server

# 总结
简单了解下上面各个生命周期组件继承以及命名,多多少少能猜测出各个组件的作用(命名规范还是很重要),这么多组件或者类继承了生命周期Lifecycle 的重要性不言而喻。
上面简单介绍实现生命周期的类,对tomcat结构有个初步认识。
# BootStrap
org.apache.catalina.startup.BootStrap类为整个tomcat启动入口,其中main方法作为主线程启动,传统方式都是通过脚本或者启动main方法开发,
注意 :springboot内嵌的tomcat不是这个方式启动(可以肯定不是调用这个方法,在Java中一个程序只能有一个主线程方法!因为springboot中有主线程启动 SpringApplication 了,如果想简单了解 springboot 启动原理与自动配置原理 (opens new window) 可以看看。),
public static void main(String args[]) {

        // 采用双重懒加载模式
        // 锁
        // private static final Object daemonLock = new Object();
        synchronized (daemonLock) {
            if (daemon == null) {
                // Don't set daemon until init() has completed
                Bootstrap bootstrap = new Bootstrap();
                try {
                    // 调用 init 方法
                    bootstrap.init();
                } catch (Throwable t) {
                    handleThrowable(t);
                    t.printStackTrace();
                    return;
                }
                daemon = bootstrap;
            } else {

                Thread.currentThread().setContextClassLoader(daemon.catalinaLoader);
            }
        }

        try {
            /** 直接调用Bootstrap时,如果传入的args空,默认就是启动tomcat的行为*/
            // 下面可以看到可以通过tomcat启动时候传入参数
            // 这就是通常使用 脚本 start/stop/...
            String command = "start";
            if (args.length > 0) {
                command = args[args.length - 1];
            }

            if (command.equals("startd")) {
                args[args.length - 1] = "start";
                daemon.load(args);
                daemon.start();
            } else if (command.equals("stopd")) {
                args[args.length - 1] = "stop";
                daemon.stop();
            } else if (command.equals("start")) {
                daemon.setAwait(true);
                /**加载catalina*/
                daemon.load(args);
                daemon.start();
                if (null == daemon.getServer()) {
                    System.exit(1);
                }
            } else if (command.equals("stop")) {
                daemon.stopServer(args);
            } else if (command.equals("configtest")) {
                daemon.load(args);
                if (null == daemon.getServer()) {
                    System.exit(1);
                }
                System.exit(0);
            } else {
                log.warn("Bootstrap: command \"" + command + "\" does not exist.");
            }
        } catch (Throwable t) {
            // Unwrap the Exception for clearer error reporting
            if (t instanceof InvocationTargetException &&
                    t.getCause() != null) {
                t = t.getCause();
            }
            handleThrowable(t);
            t.printStackTrace();
            System.exit(1);
        }
    }
2
3
4
5
6
7
8
9
10
11
12
13
14
15
16
17
18
19
20
21
22
23
24
25
26
27
28
29
30
31
32
33
34
35
36
37
38
39
40
41
42
43
44
45
46
47
48
49
50
51
52
53
54
55
56
57
58
59
60
61
62
63
64
65
66
67
68
69
70
# init
看看 org.apache.catalina.startup.BootStrap#init() 类的初始化方法
    public void init() throws Exception {

        System.out.println("======> Bootstrap init.");
        /**初始化类加载器(common、server、shared)*/
        initClassLoaders();

        /**
         * 设置当前线程上下文类加载器为catalinaLoader即server类加载器
         * 主要为了打破父委托模式,让父类加载器加载到子类加载器路径下的class
         * 其应用场景:
         * 如果有N个Web应用程序都是用Spring来进行组织和管理的话,
         * 可以把Spring放到Common或Shared目录下让这些程序共享。Spring要对用户程序
         * 的类进行管理,自然要能访问到用户程序的类,而用户的程序显然是放
         * 在/WebApp/WEB-INF目录中的,那么被CommonClassLoader或
         * SharedClassLoader加载的Spring如何访问并不在其加载范围内的用户程序呢?
         * 那就只能用下面这种方式了,这就打破了父委派模式,还有其他:JNDI、JDBC等都是
         */
        Thread.currentThread().setContextClassLoader(catalinaLoader);

        SecurityClassLoad.securityClassLoad(catalinaLoader);

        // Load our startup class and call its process() method
        if (log.isDebugEnabled()) {
            log.debug("Loading startup class");
        }
        Class<?> startupClass = catalinaLoader.loadClass("org.apache.catalina.startup.Catalina");
        /**
         * 利用反射实例化Catalina对象
         * 这里为什么要使用反射? 你看源码里Bootstrap和Catalina就差“睡在一起了”,为什么还这么生疏要反射获得呢?
         *  参考链接 https://www.processon.com/view/link/6323f13ce0b34d330066776b
         */
        Object startupInstance = startupClass.getConstructor().newInstance();

        // Set the shared extensions class loader
        if (log.isDebugEnabled()) {
            log.debug("Setting startup class properties");
        }
        /**{@link Catalina#setParentClassLoader(ClassLoader)}*/
        String methodName = "setParentClassLoader";
        Class<?> paramTypes[] = new Class[1];
        /**参数类型是:ClassLoader*/
        paramTypes[0] = Class.forName("java.lang.ClassLoader");
        /**参数个数1个,其实就是共享的类加载器*/
         Object paramValues[] = new Object[1];
        /**
         * 这个地方注意了,整个Catalina下面所有的容器都将使用这个sharedLoader类加载实例作为父
         * 比如StandardContext中的{@link org.apache.catalina.loader.WebappClassLoaderBase}的父加载器就是sharedLoader
         */
        paramValues[0] = sharedLoader;
        Method method = startupClass.getMethod(methodName, paramTypes);
        /**使用反射方式调用setParentClassLoader设置为shareLoader*/
        method.invoke(startupInstance, paramValues);
        /**设置catalina守护线程(Catalina实例)*/
        catalinaDaemon = startupInstance;
    }
2
3
4
5
6
7
8
9
10
11
12
13
14
15
16
17
18
19
20
21
22
23
24
25
26
27
28
29
30
31
32
33
34
35
36
37
38
39
40
41
42
43
44
45
46
47
48
49
50
51
52
53
54
55
56
初始化完毕后调用org.apache.catalina.startup.BootStrap#main()=>load()方法,还需要走下面两个流程。
daemon.load(args);
daemon.start();
2
# laod
org.apache.catalina.startup.BootStrap#load
private void load(String[] arguments) throws Exception {

        // Call the load() method
        // 通过反射调用Catalina的load方法,主要做一些配置工作,比如解析server.xml,拿到server节点,然后对server组件进行init调用等
        // 此处内容在 Catania 内会有补充
        String methodName = "load";
        Object param[];
        Class<?> paramTypes[];
        if (arguments==null || arguments.length==0) {
            paramTypes = null;
            param = null;
        } else {
            paramTypes = new Class[1];
            paramTypes[0] = arguments.getClass();
            param = new Object[1];
            param[0] = arguments;
        }
        Method method =
            catalinaDaemon.getClass().getMethod(methodName, paramTypes);
        if (log.isDebugEnabled()) {
            log.debug("Calling startup class " + method);
        }
        /**调用{@link Catalina#load()方法}*/
        method.invoke(catalinaDaemon, param);
    }
2
3
4
5
6
7
8
9
10
11
12
13
14
15
16
17
18
19
20
21
22
23
24
25
# start
org.apache.catalina.startup.BootStrap#start()
    public void start() throws Exception {
        if (catalinaDaemon == null) {//如果catalina等于null,那就再走一遍init
            init();
        }
        Method method = catalinaDaemon.getClass().getMethod("start", (Class [])null);
        method.invoke(catalinaDaemon, (Object [])null);
    }
2
3
4
5
6
7
8
# Catalina
上面 bootstrap留下两个注意问题,启动过程中调用了Catalina类中 load 方法 和 start 方法
# load
# 有参数load
对于有参数的 load
    public void load(String args[]) {

        try {
            if (arguments(args)) {
                load();
            }
        } catch (Exception e) {
            e.printStackTrace(System.out);
        }
    }
2
3
4
5
6
7
8
9
10
11
# catalina 解析参数
实际核心 load 之前解析参数
protected boolean arguments(String args[]) {

        boolean isConfig = false;
        boolean isGenerateCode = false;

        if (args.length < 1) {
            usage();
            return false;
        }

        // 可以看到 catalina 系统支持参数配置
        for (String arg : args) {
            if (isConfig) {
                configFile = arg;
                isConfig = false;
            } else if (arg.equals("-config")) {
                isConfig = true;
            } else if (arg.equals("-generateCode")) {
                setGenerateCode(true);
                isGenerateCode = true;
            } else if (arg.equals("-useGeneratedCode")) {
                setUseGeneratedCode(true);
                isGenerateCode = false;
            } else if (arg.equals("-nonaming")) {
                setUseNaming(false);
                isGenerateCode = false;
            } else if (arg.equals("-help")) {
                usage();
                return false;
            } else if (arg.equals("start")) {
                isGenerateCode = false;
                // NOOP
            } else if (arg.equals("configtest")) {
                isGenerateCode = false;
                // NOOP
            } else if (arg.equals("stop")) {
                isGenerateCode = false;
                // NOOP
            } else if (isGenerateCode) {
                generatedCodeLocationParameter = arg;
                isGenerateCode = false;
            } else {
                usage();
                return false;
            }
        }

        return true;
    }
2
3
4
5
6
7
8
9
10
11
12
13
14
15
16
17
18
19
20
21
22
23
24
25
26
27
28
29
30
31
32
33
34
35
36
37
38
39
40
41
42
43
44
45
46
47
48
49
# 核心load方法
核心org.apache.catalina.startup.Catalina#load方法
    /**
     * Start a new server instance.
     * 启动一个catalina 服务实例 ,1个tomcat对应1个catalina server
     */
    public void load() {

        System.out.println("======> Catalina load.");
        if (loaded) {
            /**如果加载过了,直接返回,避免重复解析重复init组件*/
            return;
        }

        loaded = true;
        long t1 = System.nanoTime();
        /**废弃方法(空实现),10之后会移除*/
        initDirs();

        // Before digester(xml解析框架) - it may be needed
        /***
         * 设置naming系统变量,配置JNDI初始化上下文工厂类
         * 后面注册MBean的时候会用到,因为JMX会配合JNDI使用,将JNDI的服务注册到MBeanServer中
         */
        initNaming();

        // Parse main server.xml,解析Tomcat核心配置文件 ../conf.server.xml
        // 开始解析 xml 配置文件了 !!!
        parseServerXml(true);
        System.out.println("======> Catalina#digester#parse解析完毕。");

        /**这个地方在本类中拿get有点诡异,其实直接判断server变量就可以了*/
        Server s = getServer();
        if (s == null) {
            return;
        }

        /**设置反向关联,即1个server实例关联1个catalina实例*/
        server.setCatalina(this);
        /**设置catalina server 的安装路径(bin、lib父目录)*/
        server.setCatalinaHome(Bootstrap.getCatalinaHomeFile());
        /**设置catalina server 的工作路径(conf、webapps、logs等父目录)*/
        server.setCatalinaBase(Bootstrap.getCatalinaBaseFile());

        // Stream redirection
        initStreams();

        // Start the new server
        try {
            /**
             * 初始化server组件(其是一个生命周期组件,其内部又包含多个services,层层向下传递init)
             * 先走父类的init方法{@link org.apache.catalina.util.LifecycleBase#init()}
             * 再走Server的initInternal方法{@link org.apache.catalina.core.StandardServer#initInternal()}
             */
            server.init();
        } catch (LifecycleException e) {
            if (Boolean.getBoolean("org.apache.catalina.startup.EXIT_ON_INIT_FAILURE")) {
                throw new java.lang.Error(e);
            } else {
                log.error(sm.getString("catalina.initError"), e);
            }
        }

        if(log.isInfoEnabled()) {
            log.info(sm.getString("catalina.init", Long.toString(TimeUnit.NANOSECONDS.toMillis(System.nanoTime() - t1))));
        }
        System.out.println("==========>Catalina#load()结束");
    }
2
3
4
5
6
7
8
9
10
11
12
13
14
15
16
17
18
19
20
21
22
23
24
25
26
27
28
29
30
31
32
33
34
35
36
37
38
39
40
41
42
43
44
45
46
47
48
49
50
51
52
53
54
55
56
57
58
59
60
61
62
63
64
65
66
67
# parseServerXml
 /**
     * 解析tomcat核心配置文件server.xml
     * @param start true表示启动,false表示stop
     */
    protected void parseServerXml(boolean start) {
        // Set configuration source
        ConfigFileLoader.setSource(new CatalinaBaseConfigurationSource(Bootstrap.getCatalinaBaseFile(), getConfigFile()));
        /**拿到 ../conf/server.xml 文件对象*/
        File file = configFile();

        if (useGeneratedCode && !Digester.isGeneratedCodeLoaderSet()) {
            // Load loader
            String loaderClassName = generatedCodePackage + ".DigesterGeneratedCodeLoader";
            try {
                Digester.GeneratedCodeLoader loader = (Digester.GeneratedCodeLoader)
                        Catalina.class.getClassLoader().loadClass(loaderClassName).getDeclaredConstructor().newInstance();
                Digester.setGeneratedCodeLoader(loader);
            } catch (Exception e) {
                if (log.isDebugEnabled()) {
                    log.info(sm.getString("catalina.noLoader", loaderClassName), e);
                } else {
                    log.info(sm.getString("catalina.noLoader", loaderClassName));
                }
                // No loader so don't use generated code
                useGeneratedCode = false;
            }
        }

        // Init source location
        File serverXmlLocation = null;
        String xmlClassName = null;
        if (generateCode || useGeneratedCode) {
            /**  generatedCodePackage = "catalinaembedded" */
            xmlClassName = start ? generatedCodePackage + ".ServerXml" : generatedCodePackage + ".ServerXmlStop";
        }
        if (generateCode) {
            if (generatedCodeLocationParameter != null) {
                generatedCodeLocation = new File(generatedCodeLocationParameter);
                if (!generatedCodeLocation.isAbsolute()) {
                    generatedCodeLocation = new File(Bootstrap.getCatalinaHomeFile(), generatedCodeLocationParameter);
                }
            } else {
                generatedCodeLocation = new File(Bootstrap.getCatalinaHomeFile(), "work");
            }
            serverXmlLocation = new File(generatedCodeLocation, generatedCodePackage);
            if (!serverXmlLocation.isDirectory() && !serverXmlLocation.mkdirs()) {
                log.warn(sm.getString("catalina.generatedCodeLocationError", generatedCodeLocation.getAbsolutePath()));
                // Disable code generation
                generateCode = false;
            }
        }

        ServerXml serverXml = null;
        if (useGeneratedCode) {
            serverXml = (ServerXml) Digester.loadGeneratedClass(xmlClassName);
        }

        if (serverXml != null) {
            serverXml.load(this);
        } else {
            try (ConfigurationSource.Resource resource = ConfigFileLoader.getSource().getServerXml()) {
                // Create and execute our Digester
                /***
                 * Digester是一款用于将XML转化为Java对象的事件驱动工具,是对SAX的高层次的封装。
                 * Digester针对SAX事件提供了更加友好的接口,隐藏了XML节点具体的层次细节,使得开发者可以更加专注于处理过程。
                 * Digester的对象栈主要是在匹配模式满足是,由处理规则进行操作。他提供了常见的栈操作:
                 * clear:清空对象栈。
                 * peek:该操作有数个重载方法,可以实现得到位于栈顶部的对象或者从顶部数第n个对象,但是不会将对象从栈中移除。
                 * pop:将位于栈顶部的对象移除并且返回。
                 * push:将对象放到栈顶部。
                 * Digester的设计模式是指,在文件读取过程中,如果遇到一个XML节点的开始部分,则会出发处理规则事件创建Java对象,并且将其放入栈中。当处理该节点的时候,该对象都将维护在栈中。当遇到该节点的结束部分时候,该对象将会从栈中取出并且清除。
                 */
                Digester digester = start ? createStartDigester() : createStopDigester();
                InputStream inputStream = resource.getInputStream();
                InputSource inputSource = new InputSource(resource.getURI().toURL().toString());
                inputSource.setByteStream(inputStream);
                digester.push(this);
                if (generateCode) {
                    digester.startGeneratingCode();
                    generateClassHeader(digester, start);
                }
                System.out.println("======> Catalina#digester解析../conf/server.xml");
                /**解析xml文件*/
                digester.parse(inputSource);
                if (generateCode) {
                    generateClassFooter(digester);
                    try (FileWriter writer = new FileWriter(new File(serverXmlLocation,
                            start ? "ServerXml.java" : "ServerXmlStop.java"))) {
                        writer.write(digester.getGeneratedCode().toString());
                    }
                    digester.endGeneratingCode();
                    Digester.addGeneratedClass(xmlClassName);
                }
            } catch (Exception e) {
                log.warn(sm.getString("catalina.configFail", file.getAbsolutePath()), e);
                if (file.exists() && !file.canRead()) {
                    log.warn(sm.getString("catalina.incorrectPermissions"));
                }
            }
        }
    }
2
3
4
5
6
7
8
9
10
11
12
13
14
15
16
17
18
19
20
21
22
23
24
25
26
27
28
29
30
31
32
33
34
35
36
37
38
39
40
41
42
43
44
45
46
47
48
49
50
51
52
53
54
55
56
57
58
59
60
61
62
63
64
65
66
67
68
69
70
71
72
73
74
75
76
77
78
79
80
81
82
83
84
85
86
87
88
89
90
91
92
93
94
95
96
97
98
99
100
101
org.apache.tomcat.util.digester.Digester#parse()
   public Object parse(InputSource input) throws IOException, SAXException {
        configure();
        /**
         * 解析xml,并通过反射构建StandardServer实例,同时也包括engine、host实例
         * 以及还会往Server组件中添加listener 逐个节点的解析
         * 获取
         * */

        getXMLReader().parse(input);
        return root;
    }
2
3
4
5
6
7
8
9
10
11
12
org.apache.tomcat.util.digester.Digester#getXMLReader()
    public XMLReader getXMLReader() throws SAXException {
        if (reader == null) {
            reader = getParser().getXMLReader();
        }

        reader.setDTDHandler(this);
        reader.setContentHandler(this);

        EntityResolver entityResolver = getEntityResolver();
        if (entityResolver == null) {
            entityResolver = this;
        }

        // Wrap the resolver so we can perform ${...} property replacement
        if (entityResolver instanceof EntityResolver2) {
            entityResolver = new EntityResolver2Wrapper((EntityResolver2) entityResolver, source, classLoader);
        } else {
            entityResolver = new EntityResolverWrapper(entityResolver, source, classLoader);
        }

        reader.setEntityResolver(entityResolver);

        reader.setProperty("http://xml.org/sax/properties/lexical-handler", this);

        reader.setErrorHandler(this);
        return reader;
    }
2
3
4
5
6
7
8
9
10
11
12
13
14
15
16
17
18
19
20
21
22
23
24
25
26
27
28
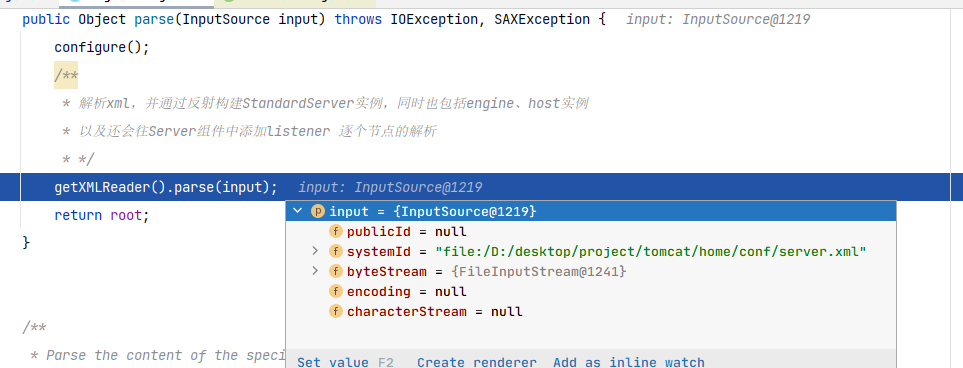
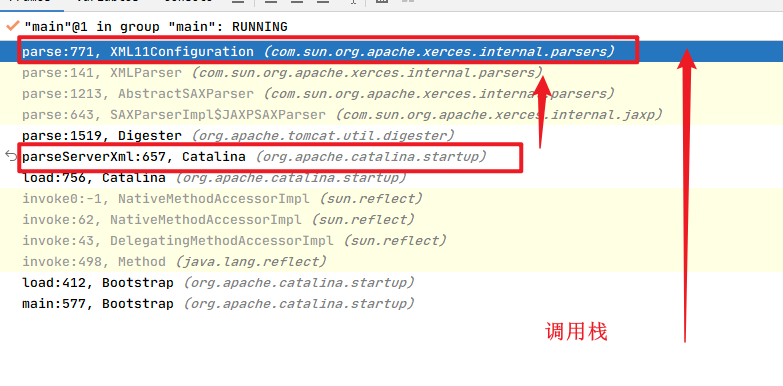
最终经过 com.sun.org.apache.xerces.internal.parsers.XML11Configuration#parse()这个方法来解析
public void parse(XMLInputSource source) throws XNIException, IOException {

        if (fParseInProgress) {
            // REVISIT - need to add new error message
            throw new XNIException("FWK005 parse may not be called while parsing.");
        }
        fParseInProgress = true;

        try {
            setInputSource(source);
            parse(true);
        } catch (XNIException ex) {
            if (PRINT_EXCEPTION_STACK_TRACE)
                ex.printStackTrace();
            throw ex;
        } catch (IOException ex) {
            if (PRINT_EXCEPTION_STACK_TRACE)
                ex.printStackTrace();
            throw ex;
        } catch (RuntimeException ex) {
            if (PRINT_EXCEPTION_STACK_TRACE)
                ex.printStackTrace();
            throw ex;
        } catch (Exception ex) {
            if (PRINT_EXCEPTION_STACK_TRACE)
                ex.printStackTrace();
            throw new XNIException(ex);
        } finally {
            fParseInProgress = false;
            // close all streams opened by xerces
            this.cleanup();
        }

    } // parse(InputSource)
2
3
4
5
6
7
8
9
10
11
12
13
14
15
16
17
18
19
20
21
22
23
24
25
26
27
28
29
30
31
32
33
34
# start
  /**
     * Start a new server instance.
     */
    public void start() {
        // 如果 sever 获取 为 null 尝试重新获取一次
        if (getServer() == null) {
            load();
        }

        if (getServer() == null) {
            log.fatal(sm.getString("catalina.noServer"));
            return;
        }

        long t1 = System.nanoTime();

        // Start the new server
        try {
            // server start 默认是
            getServer().start();
        } catch (LifecycleException e) {
            log.fatal(sm.getString("catalina.serverStartFail"), e);
            try {
                getServer().destroy();
            } catch (LifecycleException e1) {
                log.debug("destroy() failed for failed Server ", e1);
            }
            return;
        }

        if (log.isInfoEnabled()) {
            log.info(sm.getString("catalina.startup", Long.toString(TimeUnit.NANOSECONDS.toMillis(System.nanoTime() - t1))));
        }

        if (generateCode) {
            // Generate loader which will load all generated classes
            generateLoader();
        }

        // Register shutdown hook
        if (useShutdownHook) {
            if (shutdownHook == null) {
                shutdownHook = new CatalinaShutdownHook();
            }
            Runtime.getRuntime().addShutdownHook(shutdownHook);

            // If JULI is being used, disable JULI's shutdown hook since
            // shutdown hooks run in parallel and log messages may be lost
            // if JULI's hook completes before the CatalinaShutdownHook()
            LogManager logManager = LogManager.getLogManager();
            if (logManager instanceof ClassLoaderLogManager) {
                ((ClassLoaderLogManager) logManager).setUseShutdownHook(
                        false);
            }
        }

        if (await) {
            //
            await();
            stop();
        }
    }
2
3
4
5
6
7
8
9
10
11
12
13
14
15
16
17
18
19
20
21
22
23
24
25
26
27
28
29
30
31
32
33
34
35
36
37
38
39
40
41
42
43
44
45
46
47
48
49
50
51
52
53
54
55
56
57
58
59
60
61
62
启动
    @Override
    public final synchronized void start() throws LifecycleException {

        /**这里判断下,防止二次start,如果处于启动前/启动中/启动后这三个状态中的任意一个,都表明组件曾经是调用过start的*/
        if (LifecycleState.STARTING_PREP.equals(state) || LifecycleState.STARTING.equals(state) ||
                LifecycleState.STARTED.equals(state)) {

            if (log.isDebugEnabled()) {
                Exception e = new LifecycleException();
                log.debug(sm.getString("lifecycleBase.alreadyStarted", toString()), e);
            } else if (log.isInfoEnabled()) {
                log.info(sm.getString("lifecycleBase.alreadyStarted", toString()));
            }

            return;
        }

        if (state.equals(LifecycleState.NEW)) {
            init(); /**如果组件处于NEW状态,就先初始化*/
        } else if (state.equals(LifecycleState.FAILED)) {
            stop();
        } else if (!state.equals(LifecycleState.INITIALIZED) &&
                !state.equals(LifecycleState.STOPPED)) {
            invalidTransition(Lifecycle.BEFORE_START_EVENT);
        }

        try {
            setStateInternal(LifecycleState.STARTING_PREP, null, false);
            startInternal();
            if (state.equals(LifecycleState.FAILED)) {
                // This is a 'controlled' failure. The component put itself into the
                // FAILED state so call stop() to complete the clean-up.
                stop();
            } else if (!state.equals(LifecycleState.STARTING)) {
                // Shouldn't be necessary but acts as a check that sub-classes are
                // doing what they are supposed to.
                invalidTransition(Lifecycle.AFTER_START_EVENT);
            } else {
                setStateInternal(LifecycleState.STARTED, null, false);
            }
        } catch (Throwable t) {
            // This is an 'uncontrolled' failure so put the component into the
            // FAILED state and throw an exception.
            handleSubClassException(t, "lifecycleBase.startFail", toString());
        }
    }
2
3
4
5
6
7
8
9
10
11
12
13
14
15
16
17
18
19
20
21
22
23
24
25
26
27
28
29
30
31
32
33
34
35
36
37
38
39
40
41
42
43
44
45
46
47
# StandardServer
# 了解
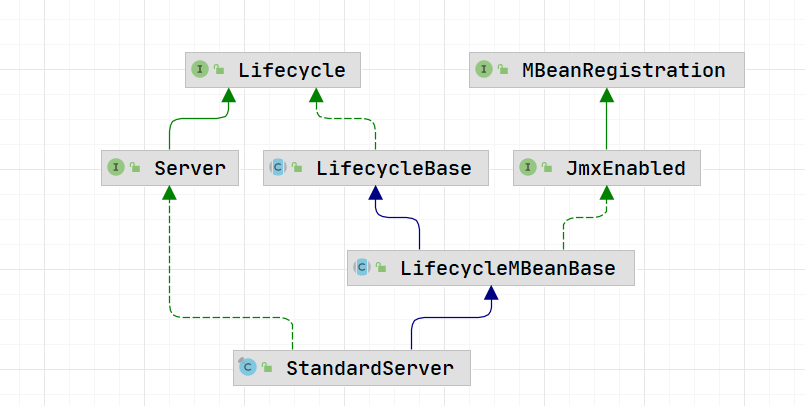
可以看看基本属性
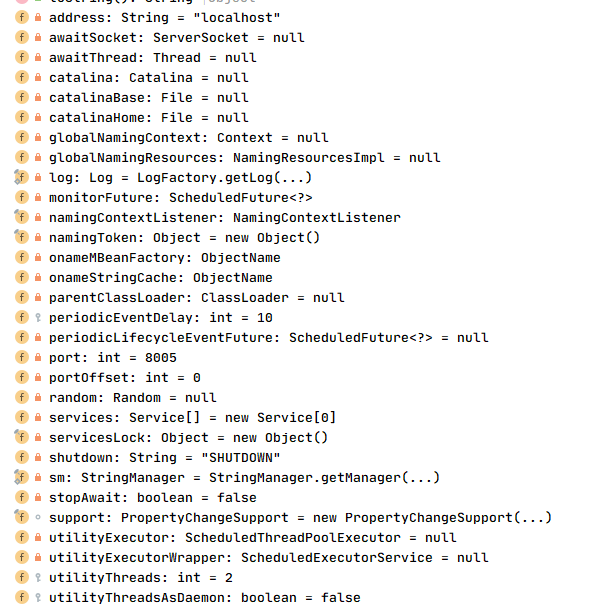
里面包含大量基本属性,都是见名知意,对于一个tomcat而言,可以有多个 server 服务
# init
    @Override
    public final synchronized void init() throws LifecycleException {
        /**
         * 下面的意思是:你组件初始化的时候必须是处于new的状态,为什么呢? 因为状态机中你第一次初始化时
         * 不处于new难不成还处于start或stop状态? 那不就乱套了,这里当然会抛异常了!
         * */
        if (!state.equals(LifecycleState.NEW)) {
            invalidTransition(Lifecycle.BEFORE_INIT_EVENT);
        }
        try {
            /**
             *  发布 Lifecycle.BEFORE_INIT_EVENT 事件,
             *  如果当前组件注册的有listeners就回调反之不处理
             *  事实上仅有Server组件的lifecycleListeners不为空
             * */
            setStateInternal(LifecycleState.INITIALIZING, null, false);
            /**具体子类来实现,(模板方法)
             * {@link org.apache.catalina.core.StandardServer#initInternal()}
             * {@link org.apache.catalina.core.StandardService#initInternal()}
             * {@link org.apache.catalina.core.StandardEngine#initInternal()}
             * {@link org.apache.catalina.core.StandardHost#initInternal()}
             * {@link org.apache.catalina.core.StandardContext#initInternal()}
             * {@link org.apache.catalina.core.StandardWrapper#initInternal()}
             * 其他不在列举......
             */
            initInternal();
            /** 发布 Lifecycle.AFTER_INIT_EVENT 事件,如果当前组件注册的有listeners就回调反之不处理*/
            setStateInternal(LifecycleState.INITIALIZED, null, false);
        } catch (Throwable t) {
            handleSubClassException(t, "lifecycleBase.initFail", toString());
        }
    }
2
3
4
5
6
7
8
9
10
11
12
13
14
15
16
17
18
19
20
21
22
23
24
25
26
27
28
29
30
31
32
33
34
35
36
37
# initInternal
    @Override
    protected void initInternal() throws LifecycleException {

        super.initInternal();
        // Initialize utility executor
        reconfigureUtilityExecutor(getUtilityThreadsInternal(utilityThreads));
        register(utilityExecutor, "type=UtilityExecutor");
        onameStringCache = register(new StringCache(), "type=StringCache");

        // Register the MBeanFactory
        MBeanFactory factory = new MBeanFactory();
        factory.setContainer(this);
        onameMBeanFactory = register(factory, "type=MBeanFactory");
        // Register the naming resources 将全局jndi服务注册到jmx容器中,托管给MBeanServer管理
        globalNamingResources.init();
        /***
         * 在Catalina#load时,已经设置过server的catalina实例了,所以下面会进入
         */
        if (getCatalina() != null) {
            /**
             * 这里的cl分两种情况
             * 1:如果我们在conf/catalina.properties中配置了shared.loader="${catalina.home}/shared/*.jar"
             *   那么,从catalina中取出的父类加载器就是sharedLoader,它不等于commonLoader
             * 2: 如果没有配置,sharedLoader等同于commonLoader
             */
            ClassLoader cl = getCatalina().getParentClassLoader();
            /**
             * 验证tomcat公共的jar和应用间共享的jar包资源,判断是否含有manifest.mf清单文件,不包含的将会被过忽略掉
             * 如果不配置sharedLoader的路径的话,下面这个循环只会走一次,因为sharedLoader就是commonLoader
             * 而commonLoader的parent就是scl(系统加载器,即AppClassLoader)
             */
            while (cl != null && cl != ClassLoader.getSystemClassLoader()) {
                if (cl instanceof URLClassLoader) {
                    /**下面肯定会走的,因为cl不管是commonLoader也好还是sharedLoader也好,都是URLClassLoader的子类型*/
                    URL[] urls = ((URLClassLoader) cl).getURLs();
                    for (URL url : urls) {
                        /**
                         * 遍历资源url,这个是什么,取决于你catalina.properties文件中配置的
                         * common.loader = "${catalina.base}/lib","${catalina.base}/lib/*.jar","${catalina.home}/lib","${catalina.home}/lib/*.jar"
                         * server.loader =
                         * shared.loader =
                         *
                         * 需要注意的是,代码调试的时候,是没有lib目录的,tomcat自身所需的依赖全部来自于项目的pom文件
                         */
                        if (url.getProtocol().equals("file")) {
                            try {
                                File f = new File (url.toURI());
                                if (f.isFile() && f.getName().endsWith(".jar")) {
                                    /**
                                     * ExtensionValidator: 验证jar资源的,如果jar包中有manifest,则添加到containerManifestResources列表中
                                     * 这个类有个static代码块,会首先载入jre环境下的jar,也就是优先验证java.class.path下面的所有jar资源
                                     * Java打包文件(jar文件)中一般会包含清单文件(META-INF/MANIFEST.MF),该文件能够包含主类以及加载类路径等信息。
                                     * 只要包含了正确的MANIFEST.MF,才能使用java -jar xxx.jar 直接调用执行
                                     * 通常我们不会自己打包jar,而是通过第三方工具,比如maven
                                     */
                                    ExtensionValidator.addSystemResource(f);
                                }
                            } catch (URISyntaxException | IOException e) {
                                // Ignore
                            }
                        }
                    }
                }
                cl = cl.getParent();
            }
        }
        /**
         * Initialize our defined Services
         * 初始化我们自定义的services,一个Server包含多个service
         */
        for (Service service : services) {
            service.init();
        }
    }
2
3
4
5
6
7
8
9
10
11
12
13
14
15
16
17
18
19
20
21
22
23
24
25
26
27
28
29
30
31
32
33
34
35
36
37
38
39
40
41
42
43
44
45
46
47
48
49
50
51
52
53
54
55
56
57
58
59
60
61
62
63
64
65
66
67
68
69
70
71
72
73
74
    private synchronized void setStateInternal(LifecycleState state, Object data, boolean check)
            throws LifecycleException {
        // ... 中间步骤省略!
        this.state = state;
        String lifecycleEvent = state.getLifecycleEvent();
        if (lifecycleEvent != null) {
            // 触发监听事件
            fireLifecycleEvent(lifecycleEvent, data);
        }
    }
2
3
4
5
6
7
8
9
10
11
# fireLifecycleEvent
    protected void fireLifecycleEvent(String type, Object data) {
        /**
         * 构建生命周期事件对象
         * type:事件类型(new、initializing、start等)
         * data:默认传过来的是null,一般都是日志监听回调,很少有带数据过来的
         */
        LifecycleEvent event = new LifecycleEvent(this, type, data);
        if (this instanceof StandardServer && type.equals("periodic")){
            // todo ...
        }
        for (LifecycleListener listener : lifecycleListeners) {
            /**挨个回调事件监听器(每个事件监听器还要判断event的type,type不同各个监听器执行的时机是不一样的)*/
            listener.lifecycleEvent(event);
        }
    }
2
3
4
5
6
7
8
9
10
11
12
13
14
15
# await
@Override
    public void await() {
        // ...
        // Set up a server socket to wait on
        try {
            awaitSocket = new ServerSocket(getPortWithOffset(), 1,
                    InetAddress.getByName(address));
        } catch (IOException e) {
           // handler error
        }

        try {
            awaitThread = Thread.currentThread();
            // Loop waiting for a connection and a valid command
            while (!stopAwait) {
                ServerSocket serverSocket = awaitSocket;
                if (serverSocket == null) {
                    break;
                }
                // Wait for the next connection
                Socket socket = null;
                StringBuilder command = new StringBuilder();
                try {
                    InputStream stream;
                    long acceptStartTime = System.currentTimeMillis();
                    try {
                        socket = serverSocket.accept();
                         // Ten seconds
                        socket.setSoTimeout(10 * 1000);
                        stream = socket.getInputStream();
                    } catch (SocketTimeoutException ste) {
                        // This should never happen but bug 56684 suggests that
                        // it does.
                        log.warn(sm.getString("standardServer.accept.timeout",
                                Long.valueOf(System.currentTimeMillis() - acceptStartTime)), ste);
                        continue;
                    } catch (AccessControlException ace) {
                        log.warn(sm.getString("standardServer.accept.security"), ace);
                        continue;
                    } catch (IOException e) {
                        if (stopAwait) {
                            // Wait was aborted with socket.close()
                            break;
                        }
                        log.error(sm.getString("standardServer.accept.error"), e);
                        break;
                    }

                    // Read a set of characters from the socket
                    int expected = 1024; // Cut off to avoid DoS attack
                    while (expected < shutdown.length()) {
                        if (random == null) {
                            random = new Random();
                        }
                        expected += (random.nextInt() % 1024);
                    }
                    while (expected > 0) {
                        int ch = -1;
                        try {
                            ch = stream.read();
                        } catch (IOException e) {
                            log.warn(sm.getString("standardServer.accept.readError"), e);
                            ch = -1;
                        }
                        // 退出循环
                        // Control character or EOF (-1) terminates loop
                        if (ch < 32 || ch == 127) {
                            break;
                        }
                        command.append((char) ch);
                        expected--;
                    }
                } finally {
                    // Close the socket now that we are done with it
                    try {
                        if (socket != null) {
                            socket.close();
                        }
                    } catch (IOException e) {
                        // Ignore
                    }
                }

                // Match against our command string
                boolean match = command.toString().equals(shutdown);
                if (match) {
                    log.info(sm.getString("standardServer.shutdownViaPort"));
                    break;
                } else {
                    log.warn(sm.getString("standardServer.invalidShutdownCommand", command.toString()));
                }
            }
        } finally {
            ServerSocket serverSocket = awaitSocket;
            awaitThread = null;
            awaitSocket = null;
            // Close the server socket and return
            if (serverSocket != null) {
                try {
                    serverSocket.close();
                } catch (IOException e) {
                    // Ignore
                }
            }
        }
    }
2
3
4
5
6
7
8
9
10
11
12
13
14
15
16
17
18
19
20
21
22
23
24
25
26
27
28
29
30
31
32
33
34
35
36
37
38
39
40
41
42
43
44
45
46
47
48
49
50
51
52
53
54
55
56
57
58
59
60
61
62
63
64
65
66
67
68
69
70
71
72
73
74
75
76
77
78
79
80
81
82
83
84
85
86
87
88
89
90
91
92
93
94
95
96
97
98
99
100
101
102
103
104
105
106
org.apache.catalina.core.StandardServer#await()方法可以看到 tomcat 核心启动原理,是基于 java.net.ServerSocket 实现的!
# StringManager
# getString
tomcat也支持国际化管理,可以看看是如何实现的,核心方法org.apache.catalina.tribes.util.StringManager#getString()
 public String getString(String key) {
        if (key == null){
            String msg = "key may not have a null value";
            throw new IllegalArgumentException(msg);
        }

        String str = null;

        try {
            // Avoid NPE if bundle is null and treat it like an MRE
            if (bundle != null) {
                str = bundle.getString(key);
            }
        } catch (MissingResourceException mre) {
            // do something ...
            mre.printStackTrace();
        }
        // add 消除乱码 处理成中文字符
        if (str != null && !"".equals(str)) {
            str = new String(str.getBytes(StandardCharsets.ISO_8859_1), StandardCharsets.UTF_8);
        }

        return str;
    }
2
3
4
5
6
7
8
9
10
11
12
13
14
15
16
17
18
19
20
21
22
23
24
获取资源对象在
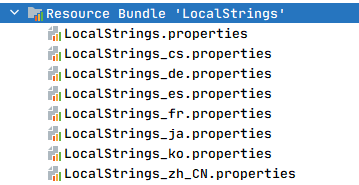
获取StringManager对象实现
 public static final synchronized StringManager getManager(
            String packageName, Locale locale) {

        Map<Locale,StringManager> map = managers.get(packageName);
        if (map == null) {
            // 可以看到采用 linkedHashMap 结构 ,
            // LinkedHashMap 只要实现了 removeEldestEntry ,天然支持 LRU 算法
            map = new LinkedHashMap<Locale,StringManager>(LOCALE_CACHE_SIZE, 1, true) {
                private static final long serialVersionUID = 1L;
                @Override
                protected boolean removeEldestEntry(
                        Map.Entry<Locale,StringManager> eldest) {
                    if (size() > (LOCALE_CACHE_SIZE - 1)) {
                        return true;
                    }
                    return false;
                }
            };
            managers.put(packageName, map);
        }

        StringManager mgr = map.get(locale);
        if (mgr == null) {
            mgr = new StringManager(packageName, locale);
            map.put(locale, mgr);
        }
        return mgr;
    }
2
3
4
5
6
7
8
9
10
11
12
13
14
15
16
17
18
19
20
21
22
23
24
25
26
27
28
默认是英文
 private StringManager(String packageName, Locale locale) {
        String bundleName = packageName + ".LocalStrings";
        ResourceBundle bnd = null;
        try {
            bnd = ResourceBundle.getBundle(bundleName, locale);
        } catch (MissingResourceException ex) {

            ClassLoader cl = Thread.currentThread().getContextClassLoader();
            if (cl != null) {
                try {
                    bnd = ResourceBundle.getBundle(bundleName, locale, cl);
                } catch (MissingResourceException ex2) {
                    // Ignore
                }
            }
        }
        bundle = bnd;
        // Get the actual locale, which may be different from the requested one
        if (bundle != null) {
            Locale bundleLocale = bundle.getLocale();
            // 默认是英文
            // static public final Locale ROOT = createConstant("", "");
            if (bundleLocale.equals(Locale.ROOT)) {
                this.locale = Locale.ENGLISH;
            } else {
                this.locale = bundleLocale;
            }
        } else {
            this.locale = null;
        }
    }
2
3
4
5
6
7
8
9
10
11
12
13
14
15
16
17
18
19
20
21
22
23
24
25
26
27
28
29
30
31
# Locale
其中 Locale 是Java内置 java.util.Locale,可以看看是由单例模式饿汉式加载许多各国语言支持。看到这里是不是对本地化有了了解?以后自己写插件是不是也可以借鉴tomcat的国家化实现方式。
public final class Locale implements Cloneable, Serializable {

    // ....

    /** Useful constant for language.
     */
    static public final Locale CHINESE = createConstant("zh", "");

    /** Useful constant for language.
     */
    static public final Locale SIMPLIFIED_CHINESE = createConstant("zh", "CN");

    /** Useful constant for language.
     */
    static public final Locale TRADITIONAL_CHINESE = createConstant("zh", "TW");


     // ....

}
2
3
4
5
6
7
8
9
10
11
12
13
14
15
16
17
18
19
20
# Mapper
# 多版本支持
版本控制与version有关,看看搜索下mapper中有关version支持的方法和属性吧
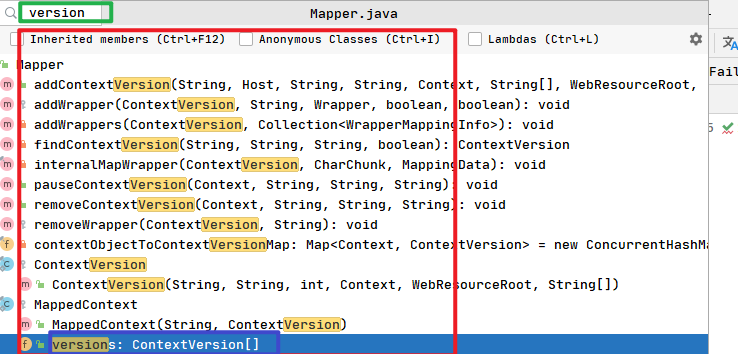
可以看到版本控制相关方法(增删改查),其中核心是 ContentxVersion,也就是上下文版本信息,有关 ContextVersion源码如下。
org.apache.catalina.mapper.Mapper$ContextVersion
 protected static final class ContextVersion extends MapElement<Context> {
        // context 的匹配路径
        public final String path;
        // 没有直接的用处,主要目的是为了计算Context中的nesting
        public final int slashCount;
        public final WebResourceRoot resources;
        //context的欢迎页面,也就是看看是否有匹配的默认首页文件
        public String[] welcomeResources;
        // 默认匹配(仅只有一个,如果多个就不是默认了),当所有都不满足的时候指定的URL:比如:/
        public MappedWrapper defaultWrapper = null;
        // 精准匹配(精准匹配,可能有多个,即一个context下有多组wrapper),完整的匹配到URL 比如 /servlet-demo/hello
        public MappedWrapper[] exactWrappers = new MappedWrapper[0];
        // 路径(通配符)匹配,匹配前面大部分URL,后面任意:比如:/servlet-demo/*
        public MappedWrapper[] wildcardWrappers = new MappedWrapper[0];
        // 扩展匹配,以扩展名的形式匹配URL,比如:*.jsp
        public MappedWrapper[] extensionWrappers = new MappedWrapper[0];
        public int nesting = 0;
        // 这个context是否还可用,是否被暂停
        private volatile boolean paused;

        public ContextVersion(String version, String path, int slashCount,
                Context context, WebResourceRoot resources,
                String[] welcomeResources) {
            super(version, context);
            this.path = path;
            this.slashCount = slashCount;
            this.resources = resources;
            this.welcomeResources = welcomeResources;
        }

        public boolean isPaused() {
            return paused;
        }

        public void markPaused() {
            paused = true;
        }
    }
2
3
4
5
6
7
8
9
10
11
12
13
14
15
16
17
18
19
20
21
22
23
24
25
26
27
28
29
30
31
32
33
34
35
36
37
38
# filter
# filters
tomcat 中默认filter是 位于org.apache.catalina.filters包下
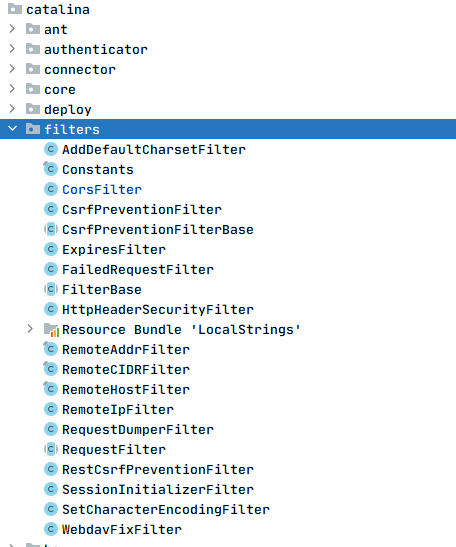
都是基于 javax.servlet.Filter的实现
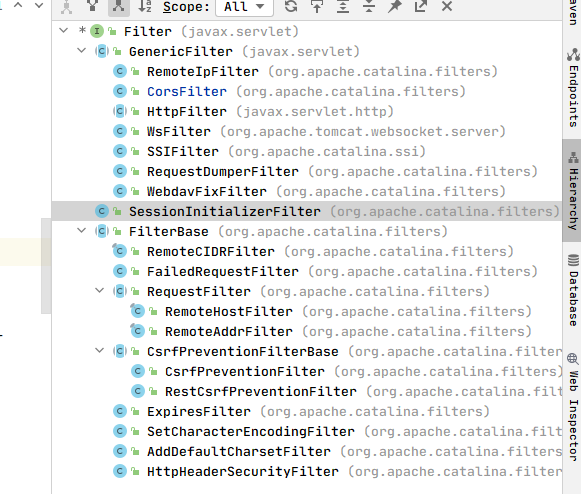
可以看到常见过滤器实现
- csrf
- cors
- expire
- remoteIp
- ...
当然tomcat不会默认加载全部过滤器,按照自己需要,在web.xml这个配置文件中加入所需的过滤器,就可实现默认功能,我们常用utf-8中文乱码过滤器就是这么实现的。
可以直接说,过滤器原理就是 在请求达到接口之前,对request 和 response对象做相应处理,然后交给下一个过滤器处理上一个过滤器处理后的request和response对象一直到
过滤器链处理完毕。
# 使用方式
# xml
    <filter>
        <filter-name>crosFilter</filter-name>
        <filter-class>org.apache.catalina.filters.CorsFilter</filter-class>
    </filter>
    <filter-mapping>
        <filter-name>crosFilter</filter-name>
        <url-pattern>/*</url-pattern>
    </filter-mapping>
2
3
4
5
6
7
8
# 注解
import org.apache.catalina.filters.CorsFilter
import javax.servlet.annotation.WebFilter

@WebFilter(urlPatterns="/**")
public class MyCorsFilter extends CorsFilter {

}
2
3
4
5
6
7
# filterChain
过滤器链是javax.servlet.FilterChain一个接口,里面只提供一个方法,在tomcat实现接口是org.apache.catalina.core.ApplicationFilterChain
public interface FilterChain {

    public void doFilter(ServletRequest request, ServletResponse response)
            throws IOException, ServletException;

}
2
3
4
5
6
7

public final class ApplicationFilterChain implements FilterChain {
    // ...

    /**
     * Invoke the next filter in this chain, passing the specified request
     * and response.  If there are no more filters in this chain, invoke
     * the <code>service()</code> method of the servlet itself.
     * 调用此链中的下一个筛选器,传递指定的请求和响应。
     * 如果此链中没有更多过滤器,则调用servlet本身的<code>service()<code>方法。
     * @param request The servlet request we are processing
     * @param response The servlet response we are creating
     *
     * @exception IOException if an input/output error occurs
     * @exception ServletException if a servlet exception occurs
     */
    @Override
    public void doFilter(ServletRequest request, ServletResponse response)
        throws IOException, ServletException {

        if( Globals.IS_SECURITY_ENABLED ) {
            final ServletRequest req = request;
            final ServletResponse res = response;
            try {
                java.security.AccessController.doPrivileged(
                        (java.security.PrivilegedExceptionAction<Void>) () -> {
                            /**调用内部的过滤器*/
                            internalDoFilter(req,res);
                            return null;
                        }
                );
            } catch( PrivilegedActionException pe) {
                Exception e = pe.getException();
                if (e instanceof ServletException) {
                    throw (ServletException) e;
                } else if (e instanceof IOException) {
                    throw (IOException) e;
                } else if (e instanceof RuntimeException) {
                    throw (RuntimeException) e;
                } else {
                    throw new ServletException(e.getMessage(), e);
                }
            }
        } else {
            /**调用内部的过滤器*/
            internalDoFilter(request,response);
        }
    }

    private void internalDoFilter(ServletRequest request,
                                  ServletResponse response)
        throws IOException, ServletException {

        // 交给下一个执行链原理就是将之前过滤器存放在 filters 中
        // 使用一次 pos++
        if (pos < n) {
            ApplicationFilterConfig filterConfig = filters[pos++];
            try {
                Filter filter = filterConfig.getFilter();

                if (request.isAsyncSupported() && "false".equalsIgnoreCase(
                        filterConfig.getFilterDef().getAsyncSupported())) {
                    request.setAttribute(Globals.ASYNC_SUPPORTED_ATTR, Boolean.FALSE);
                }
                if( Globals.IS_SECURITY_ENABLED ) {
                    final ServletRequest req = request;
                    final ServletResponse res = response;
                    Principal principal =
                        ((HttpServletRequest) req).getUserPrincipal();

                    Object[] args = new Object[]{req, res, this};
                    SecurityUtil.doAsPrivilege ("doFilter", filter, classType, args, principal);
                } else {
                    // 执行下一个filter 这个filter将filterChain对象传给这个filter,
                    // 在 pos != n 之前 重复该流程
                    filter.doFilter(request, response, this);
                }
            } catch (IOException | ServletException | RuntimeException e) {
                throw e;
            } catch (Throwable e) {
                e = ExceptionUtils.unwrapInvocationTargetException(e);
                ExceptionUtils.handleThrowable(e);
                throw new ServletException(sm.getString("filterChain.filter"), e);
            }
            return;
        }

        // We fell off the end of the chain -- call the servlet instance
        try {
            if (ApplicationDispatcher.WRAP_SAME_OBJECT) {
                lastServicedRequest.set(request);
                lastServicedResponse.set(response);
            }

            if (request.isAsyncSupported() && !servletSupportsAsync) {
                request.setAttribute(Globals.ASYNC_SUPPORTED_ATTR,
                        Boolean.FALSE);
            }
            // Use potentially wrapped request from this point
            if ((request instanceof HttpServletRequest) &&
                    (response instanceof HttpServletResponse) &&
                    Globals.IS_SECURITY_ENABLED ) {
                final ServletRequest req = request;
                final ServletResponse res = response;
                Principal principal = ((HttpServletRequest) req).getUserPrincipal();
                Object[] args = new Object[]{req, res};
                SecurityUtil.doAsPrivilege("service",
                                           servlet,
                                           classTypeUsedInService,
                                           args,
                                           principal);
            } else {
                /**经典的servlet的service出现了,这个service其实就是分发请求,按get和post转换对应的servlet处理方法*/
                servlet.service(request, response);
            }
        } catch (IOException | ServletException | RuntimeException e) {
            throw e;
        } catch (Throwable e) {
            e = ExceptionUtils.unwrapInvocationTargetException(e);
            ExceptionUtils.handleThrowable(e);
            throw new ServletException(sm.getString("filterChain.servlet"), e);
        } finally {
            if (ApplicationDispatcher.WRAP_SAME_OBJECT) {
                lastServicedRequest.set(null);
                lastServicedResponse.set(null);
            }
        }
    }

    //...
}
2
3
4
5
6
7
8
9
10
11
12
13
14
15
16
17
18
19
20
21
22
23
24
25
26
27
28
29
30
31
32
33
34
35
36
37
38
39
40
41
42
43
44
45
46
47
48
49
50
51
52
53
54
55
56
57
58
59
60
61
62
63
64
65
66
67
68
69
70
71
72
73
74
75
76
77
78
79
80
81
82
83
84
85
86
87
88
89
90
91
92
93
94
95
96
97
98
99
100
101
102
103
104
105
106
107
108
109
110
111
112
113
114
115
116
117
118
119
120
121
122
123
124
125
126
127
128
129
130
131
org.apache.catalina.core.ApplicationFilterChain#setServlet()
 void setServlet(Servlet servlet) {
        this.servlet = servlet;
 }
2
3
4
5
6
org.apache.catalina.core.ApplicationFilterFactory#createFilterChain()
    public static ApplicationFilterChain createFilterChain(ServletRequest request,
            Wrapper wrapper, Servlet servlet) {

        // ...上面逻辑省略 ...

        // 添加 servlet
        filterChain.setServlet(servlet);
        // 是否支持异步
        filterChain.setServletSupportsAsync(wrapper.isAsyncSupported());

        // 获取上下文
        StandardContext context = (StandardContext) wrapper.getParent();
        FilterMap filterMaps[] = context.findFilterMaps();

        // If there are no filter mappings, we are done
        if ((filterMaps == null) || (filterMaps.length == 0)) {
            return filterChain;
        }

        // Acquire the information we will need to match filter mappings
        DispatcherType dispatcher = (DispatcherType) request.getAttribute(Globals.DISPATCHER_TYPE_ATTR);

        String requestPath = null;
        Object attribute = request.getAttribute(Globals.DISPATCHER_REQUEST_PATH_ATTR);
        if (attribute != null){
            requestPath = attribute.toString();
        }

        String servletName = wrapper.getName();


        // 循环添加创建filterConfig忘filters这个数组中添加
        for (FilterMap filterMap : filterMaps) {
            if (!matchDispatcher(filterMap, dispatcher)) {
                continue;
            }
            if (!matchFiltersURL(filterMap, requestPath)) {
                continue;
            }

            ApplicationFilterConfig filterConfig = (ApplicationFilterConfig) context.findFilterConfig(filterMap.getFilterName());
            if (filterConfig == null) {
                // FIXME - log configuration problem
                continue;
            }
            filterChain.addFilter(filterConfig);
        }


        // Return the completed filter chain
        return filterChain;
    }
2
3
4
5
6
7
8
9
10
11
12
13
14
15
16
17
18
19
20
21
22
23
24
25
26
27
28
29
30
31
32
33
34
35
36
37
38
39
40
41
42
43
44
45
46
47
48
49
50
51
52
53
54
该方调用在org.apache.catalina.core.ApplicationDispatcher#invoke() 和 org.apache.catalina.core.StandardWrapperValve#invoke()中,这里就不贴了。
补充: 上面调用方法中有个 native 核心方法
java.security.AccessController#doPrivileged()
@CallerSensitive
public static native <T> T doPrivileged(PrivilegedExceptionAction<T> action) throws PrivilegedActionException;
2
java.security.PrivilegedAction
public interface PrivilegedAction<T> {
    T run();
}
2
3
4
# 默认过滤器实现原理
# CrosFilter (opens new window)
# ExpireFilter (opens new window)
# 其他
# 容器组件
# Host
# Engine
# Context
# Wrapper
# 类加载器
// todo
- 什么是双亲委派机制
- tomcat 为什么要打破双亲委派机制
# 多种部署方式
// todo
// 分析tomcat如何支持多种部署流程
# 线程池
// todo
// 分析 tomcat 线程池情况
// tomcat线程池性能
# Tomcat设计模式
# tomcat 中使用到的设计模式如下:
- 单例模式
- 模板模式
- 装饰器模式
- 代理模式
- 观察模式
- 享元模式
- 工厂模式
- 策略模式
- 适配器模式
- 责任链模式
- 状态模式
- 建造者模式
- 访问者模式
// todo
// 分析 tomcat 使用的设计模式 为什么要使用这些模式?
