 script 入门体验
python 爬虫框架 ,和 Java 中 spring,zookeeer等,JavaScript 中的 webpack、ElementUI 等等类似,拥有一套完善的爬虫体系 。可以说安装了scrapy 不需要依赖其他第三方库就可以完成爬虫工作了!
# scrapy入门
# 前言
python 爬虫框架 ,和 Java 中 spring,zookeeer等,JavaScript 中的 webpack、ElementUI 等等类似,拥有一套完善的爬虫体系 。可以说安装了scrapy 不需要依赖其他第三方库就可以完成爬虫工作了!
# 安装
# 开始
# 首先执行该命令 到python安装文件夹,然后进入scripy 文件夹
# 例如 D:\environment\python\Scripts>
# 执行下载命令
pip install scrapy
# 使用国内镜像下载提高访问速度
pip install scrapy -i https://pypi.douban.com/simple
2
3
4
5
6
# 报错问题
参考地址 : https://www.yiibai.com/scrapy/scrapy_environment.html
- 如果是因为版本问题报错升级安装包
python -m pip install --upgrage pip
- 系统型号报错
python install pypiwin32
- 如果以上方式安装失败使用 anaconda
注意 安装时一定要安装到python环境目录的scripts目录中,如果安装到该目录需要配置环境变量!
# 使用
# 命令介绍
Usage:
  scrapy <command> [options] [args]

Available commands:
  bench         快速测试
  check         检查
  commands
  crawl         运行一个爬虫程序
  edit          编辑爬虫文件
  fetch         类似于JavaScript 浏览器 Fetch API,获取url请求
  genspider     使用该命令创建一个爬虫模板 通常  scrapy  genspider  文件名 请求地址
  list          列表形式列出可用爬虫程序
  parse         测试地址信息 例如 scrapy parse https://www.baidu.com
  runspider     Run a self-contained spider (without creating a project)
  settings      Get settings values
  shell         命令模式执行
  startproject  创建一个基于scrapy框架简单项目架构
  version       查看当前scrapy 版本号
  view          使用浏览器打开 例如 scrapy view https://www.baiu.com

Use "scrapy <command> -h" 查看该命令详细信息
2
3
4
5
6
7
8
9
10
11
12
13
14
15
16
17
18
19
20
21
22
测试命令 scrapy shell https://www.baidu.com
scrapy shell https://www.baidu.com

# 输出最后几行内容
[s] Available Scrapy objects:
[s]   scrapy     scrapy module (contains scrapy.Request, scrapy.Selector, etc)
[s]   crawler    <scrapy.crawler.Crawler object at 0x000002341C91EEF0>
[s]   item       {}
[s]   request    <GET https://www.baidu.com>
[s]   response   <200 https://www.baidu.com>
[s]   settings   <scrapy.settings.Settings object at 0x000002341C91F490>
[s]   spider     <BaiduSpider 'baidu' at 0x2341cefe320>
[s] Useful shortcuts:
[s]   fetch(url[, redirect=True]) Fetch URL and update local objects (by default, redirects are followed)
[s]   fetch(req)                  Fetch a scrapy.Request and update local objects
[s]   shelp()           Shell help (print this help)
[s]   view(response)    View response in a browser
2
3
4
5
6
7
8
9
10
11
12
13
14
15
16
操作(需要安装ipython)
下面 获取了response类型以及 response对象含有的方法
In [1]: response
Out[1]: <200 https://www.baidu.com>
# 输出response对象含有的方法
In [2]: dir(response)
Out[2]:
['_DEFAULT_ENCODING',
 '__annotations__',
 '__class__',
 '__delattr__',
 '__dict__',
 '__dir__',
 '__doc__',
 '__eq__',
 '__format__',
 '__ge__',
 '__getattribute__',
 '__gt__',
 '__hash__',
 '__init__',
 '__init_subclass__',
 '__le__',
 '__lt__',
 '__module__',
 '__ne__',
 '__new__',
 '__reduce__',
 '__reduce_ex__',
 '__repr__',
 '__setattr__',
 '__sizeof__',
 '__slots__',
 '__str__',
 '__subclasshook__',
 '__weakref__',
 '_auto_detect_fun',
 '_body',
 '_body_declared_encoding',
 '_body_inferred_encoding',
 '_cached_benc',
 '_cached_decoded_json',
 '_cached_selector',
 '_cached_ubody',
 '_declared_encoding',
 '_encoding',
 '_get_body',
 '_get_url',
 '_headers_encoding',
 '_set_body',
 '_set_url',
 '_url',
 'attributes',
 'body',
 'cb_kwargs',
 'certificate',
 'copy',
 'css',
 'encoding',
 'flags',
 'follow',
 'follow_all',
 'headers',
 'ip_address',
 'json',
 'meta',
 'protocol',
 'replace',
 'request',
 'selector',
 'status',
 'text',
 'url',
 'urljoin',
 'xpath']
2
3
4
5
6
7
8
9
10
11
12
13
14
15
16
17
18
19
20
21
22
23
24
25
26
27
28
29
30
31
32
33
34
35
36
37
38
39
40
41
42
43
44
45
46
47
48
49
50
51
52
53
54
55
56
57
58
59
60
61
62
63
64
65
66
67
68
69
70
71
72
73
74
简单测试下几个属性以及方法
In [4]: response.url
Out[4]: 'https://www.baidu.com'

In [5]: response.xpath('//title/text()')
Out[5]: [<Selector xpath='//title/text()' data='百度一下,你就知道'>]

In [6]: response.xpath('//title/text()').get()
Out[6]: '百度一下,你就知道'
# 输出response对象的类
In [7]: type(response)
Out[6]: scrapy.http.response.html.HtmlResponse
2
3
4
5
6
7
8
9
10
11
12
获取标题和图片地址
In [10]: response.xpath('//div[@id="lg"]//img[1]')
Out[10]: [<Selector xpath='//div[@id="lg"]//img[1]' data='<img hidefocus="true" id="s_lg_img" c...'>]

In [11]: response.xpath('//div[@id="lg"]//img[1]').extract()
Out[11]: ['<img hidefocus="true" id="s_lg_img" class="index-logo-src" src="//www.baidu.com/img/PCtm_d9c8750bed0b3c7d089fa7d55720d6cf.png" width="270" height="129"
onerror="this.src=\'//www.baidu.com/img/flexible/logo/pc/index.png\';this.onerror=null;" usemap="#mp">']

In [12]: response.xpath('//div[@id="lg"]//img[1]/@src')
Out[12]: [<Selector xpath='//div[@id="lg"]//img[1]/@src' data='//www.baidu.com/img/PCtm_d9c8750bed0b...'>]

In [13]: response.xpath('//div[@id="lg"]//img[1]/@src').get()
Out[13]: '//www.baidu.com/img/PCtm_d9c8750bed0b3c7d089fa7d55720d6cf.png'

In [14]: response.xpath('//div[@id="lg"]//img[1]/@src').get().replace('//','')
Out[14]: 'www.baidu.com/img/PCtm_d9c8750bed0b3c7d089fa7d55720d6cf.png'

In [15]: response.xpath('//title/text()')
Out[15]: [<Selector xpath='//title/text()' data='百度一下,你就知道'>]
2
3
4
5
6
7
8
9
10
11
12
13
14
15
16
17
18
19
发现百度很坏哦!😄,搞个链接还有双下划线
# 源码部分(入门)
~scrapy.http.response.html.HtmlResponse~ 源代码
from scrapy.http.response.text import TextResponse


class HtmlResponse(TextResponse):
    pass
2
3
4
5
class TextResponse(Response):
该对象继承与 scrapy.http.response.text.TextResponse

继承该对类有两个子类 上图所示
待会使用scrapy 抓取内容 使用最多方法 ~xpath~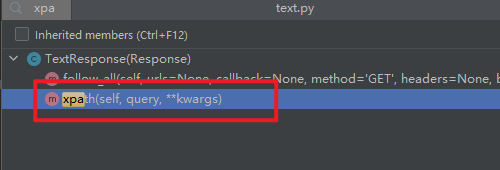
更多内容请参考源代码,本次仅仅介绍了response对象的方法来源
# 创建项目
初始化
scrapy startproject scrapy_project_demo
进入项目
cd scrapy_project_demo
项目结构
scrapy_project_demo/
    scrapy.cfg            # 项目配置
    scrapy_project_demo/  # 项目源文件目录
        __init__.py
        items.py          # 项目目标文件类似于 Java 创建好对象属性在 spiders 文件引用
        middlewares.py    # 中间件
        pipelines.py      # 管道文件
        settings.py       # 设置文件
        spiders/          # 爬虫文件目录 主要代码路径基本上在这里完成的
            __init__.py   # 用户代码
2
3
4
5
6
7
8
9
10
查看项目编写好项目内容
D:\desktop\Learn\python\gitee-demo\spider\scrapy_project_demo>scrapy list
baidu
demo
test
2
3
4
# 起步
编写init.py 文件内容
from scrapy.spiders import Spider
class DemoSpider(Spider):
    name = "test"

    start_urls = ["https://www.baidu.com/"]

    def __init__(self, *a, **kw):
        super().__init__(*a, **kw)
        print("项目初始化..")

    def parse(self,response ):
        print("=======================")
        print("百度标签:",response.xpath('//title/text()').get())
        print("百度Logo:",response.xpath('//div[@id="lg"]//img[1]/@src').get().replace('//',''))
2
3
4
5
6
7
8
9
10
11
12
13
14
在settings.py文件中配置
- 关闭 robots协议
- 开启请求头
DEFAULT_REQUEST_HEADERS = {
    'Accept': '*/*',
    'referer':'https://www.baidu.com',
    'User-Agent': 'Mozilla/5.0 (Windows NT 10.0; Win64; x64) AppleWebKit/537.36 (KHTML, like Gecko) Chrome/105.0.0.0 Safari/537.36 Edg/105.0.1343.42'
}

# ROBOTSTXT_OBEY = True
2
3
4
5
6
7
注意: 如果还是抓取不到内容,请在请求头中添加更多内容
运行
scrapy crawl test
结果
=======================
<200 https://www.baidu.com/>
百度标签: 百度一下,你就知道
百度Logo: www.baidu.com/img/PCtm_d9c8750bed0b3c7d089fa7d55720d6cf.png
2
3
4
# scrapy 工作流程 (核心)
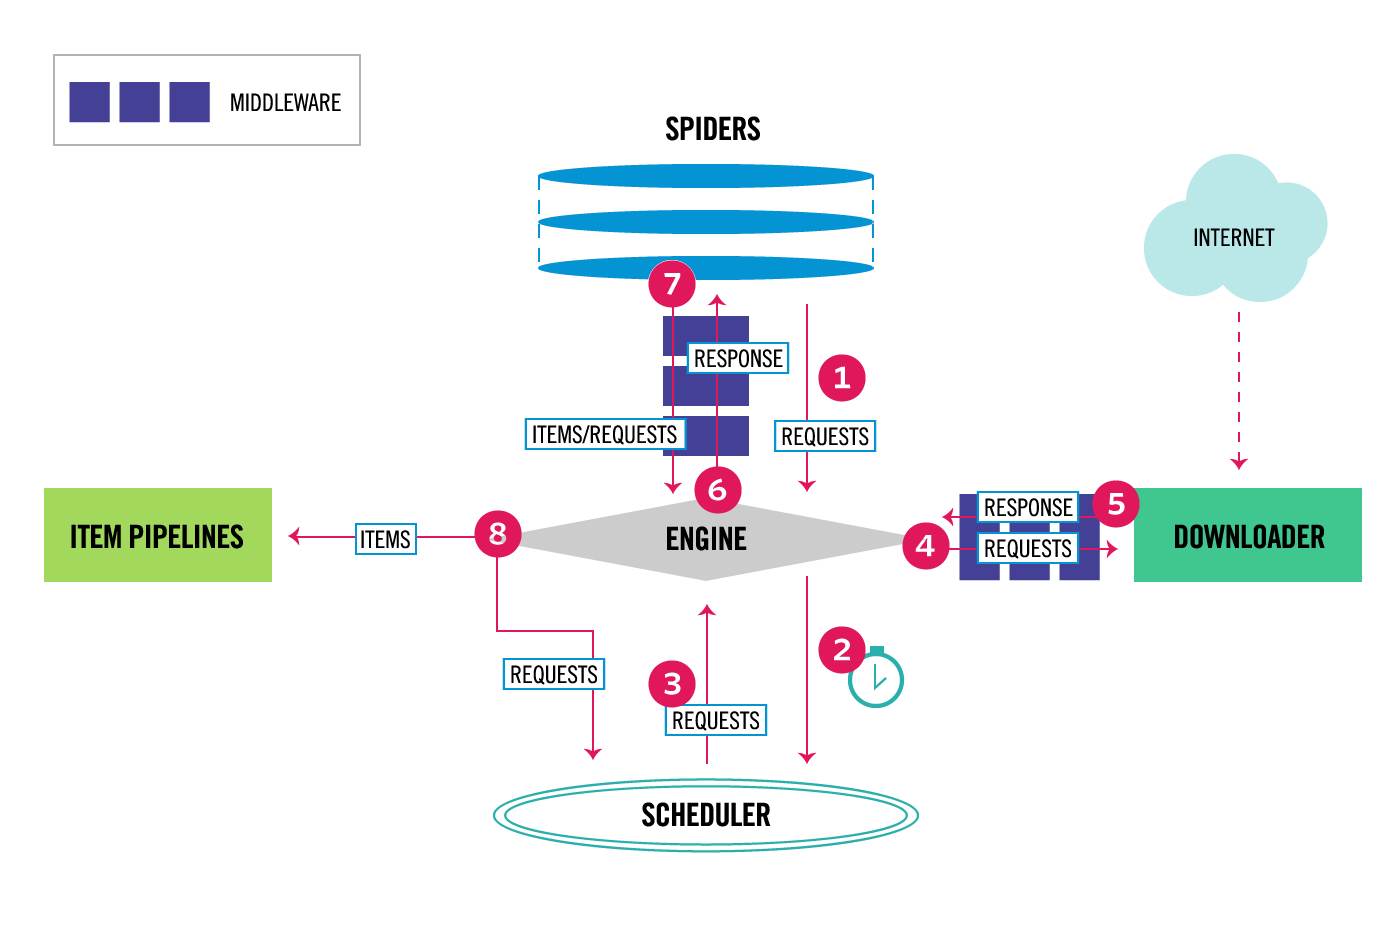
Scrapy中的数据流由执行引擎控制,如下所示:
- 这个 Engine (opens new window) 获取要从 Spider (opens new window) .
- 这个 Engine (opens new window) 在中安排请求 Scheduler (opens new window) 并请求下一个要爬行的请求。
- 这个 Scheduler (opens new window) 将下一个请求返回到 Engine (opens new window) .
- 这个 Engine (opens new window) 将请求发送到 Downloader (opens new window) ,通过 Downloader Middlewares (opens new window) (见
<span class="pre">process_request()</span>(opens new window) ) - 一旦页面完成下载, Downloader (opens new window) 生成响应(使用该页)并将其发送到引擎,并通过 Downloader Middlewares (opens new window) (见
<span class="pre">process_response()</span>(opens new window) ) - 这个 Engine (opens new window) 接收来自的响应 Downloader (opens new window) 并发送到 Spider (opens new window) 用于处理,通过 Spider Middleware (opens new window) (见
<span class="pre">process_spider_input()</span>(opens new window) ) - 这个 Spider (opens new window) 处理响应并向 Engine (opens new window) ,通过 Spider Middleware (opens new window) (见
<span class="pre">process_spider_output()</span>(opens new window) ) - 这个 Engine (opens new window) 将已处理的项目发送到 Item Pipelines (opens new window) ,然后将已处理的请求发送到 Scheduler (opens new window) 并请求可能的下一个爬行请求。
- 该过程重复(从步骤1开始),直到不再有来自 Scheduler (opens new window) .